This Quick Guide presents techniques and strategies for fully restoring physical, virtual, or even cloud machines using the Bacula Bare Metal Restore Plugin for Linux.
Bare Metal Recovery (BMR) is the term used to describe the restoration of a complete operating system to new hardware without actually going through the operating system installation procedure. The restoration data comes directly from the Bacula server to a unique bootable operating system.
The main goal is to go from a new and empty machine (bare metal) to a fully functional operating system, including all applications and data, as quickly as possible (minimal RTO).
As with any backup procedure, it is highly recommended to test the procedures for different Linux distributions, hardware, or restore environments.
BMR Planning
The real challenge of BMR is configuring the disk subsystem of the new machine in a way that resembles the layout of the original disk from which the data backup was taken and ensuring that the recovered operating system can boot.
If the new hardware is of a different type than the originally installed software backup, with significantly different architecture or drivers, BMR may not be possible. It is necessary to ensure that the BMR hardware being restored is compatible with the source system.
It is important to understand that software written for 32-bit x86 CPUs can run on 64-bit x86 CPUs, but not vice versa, and software written to run on a CPU family such as Sparc or x86 will not run on any other CPU family.
Installation
A regular installation of Enterprise Bacula Client is required for BMR, just like in any regular Bacula backup (bacula-enterprise-client and bacula-enterprise-libs.rpm packages).
Since Bacula Enterprise 8.8.0, all necessary Linux BMR mechanisms are installed by default. For older versions, also install the bacula-enterprise-client-bmr*.rpm package.
Configuration
FileSet
The machine protected by Linux BMR must have a backup of all critical partitions of the operating system to achieve successful restoration.
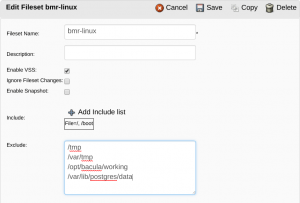
As shown in Figure 1, create a manual FileSet that includes the major Linux partitions using bweb (for example). Temporary folders and application data, such as database data files, can be excluded from the backup if desired. Enable Extended Attributes (xattr support) in the FileSet options if used by the Linux backup client.
Figure 1. Example of Linux BMR FileSet
It is also possible to create a FileSet with an Include that contains the entire automatic backup of the file systems, including /, and configure onefs=no.
FileSet {
 Name = AllUnix-U1004like
 Include {
   Options {
      signature=MD5
      compression = LZO
      xattrsupport = yes
      aclsupport = yes
      onefs = no
      fstype = ext2, ext3, ext4, xfs, msdos
   }
   File = /
  }
  Exclude {
    File = /sys
    File = /proc
    File = /tmp                    # exclude temp files
    File = /var/tmp
    File = /opt/bacula/working     # exclude Bacula working files
  }
}
Backup Job
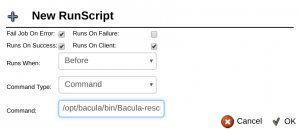
Create a new backup job, as in bweb, using the created FileSet. As shown in Figure 2, this Job should call the Bacula rescue script to save Linux details, such as partitioning (ClientRunBeforeJob = /opt/bacula/bin/Bacula-rescue.sh).
Figure 2. Linux BMR Command Script Before Backup Job
Execute a test backup job.
Restore Configuration
Bacula Live BMR bootable systems require special Client and Console resource configurations to establish a connection with the Director during restoration.
Create a new client configuration with a null address, also using bweb. The name rescue-fd is the default, so it’s a good idea to keep it. For example:
Client {
  Name = rescue-fd
  Address = 0.0.0.0
  Password = x
  Catalog = MyCatalog
}
Create a new console configuration, with the same password used for the client. For example:
Console {
  Name = rescue-fd
  Password = x
  CommandACL = *all*
  ClientACL = *all*
  CatalogACL = *all*
  JobACL = *all*
  StorageACL = *all*
  ScheduleACL = *all*
  PoolACL = *all*
  FileSetACL = *all*
  WhereACL = *all*
  UserIdACL = *all*
  DirectoryACL = *all*
}
Apply the configuration changes.
Burn the LinuxBMR-rescue-amd64-2.0.0.iso if necessary. You can use any CD/DVD burning program.
In the Linux shell, you can also compile the ISO contents onto a USB drive. For example (replace /dev/sdc with the path to your USB disk device):
root# cp LinuxBMR-rescue-amd64-2.0.0.iso /dev/sdc
root# sync
Restoration
As seen in Figure 3, boot from the Bacula BMR Live system, choose the language, keyboard layout, and select the “Start Bacula LinuxBMR” option.
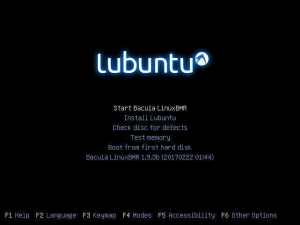
Figure 3. Start Bacula Linux BMR Option after language and layout settings
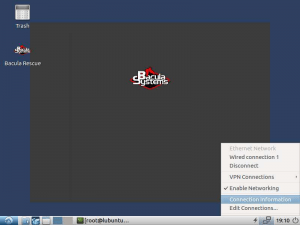
As shown in Figure 4, adjust the Linux network connection if necessary, and double-click the “Bacula Rescue” icon to start the restoration wizard.
Figure 4. Linux BMR Network Configuration and “Bacula Rescue” icon in the upper left corner
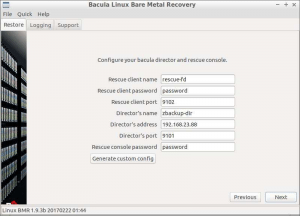
As shown in Figure 5, use your name, address, and the password of the Client/Console “rescue-fd” created earlier in this quick guide to verify the restoration options.
Figure 5. Linux BMR Restoration Connection Configuration
When the connection is OK, you can select the Client and Backup Job to start a restoration. And you’re done!
For more information on changing the original disk partitioning during the restoration process, read the reference whitepaper.
Reference
Linux Bare Metal Recovery – Bacula Enterprise Edition. http://baculasystems.com
Disponível em:  Português (Portugués, Brasil)
 English (Inglés)
 Español
