We have already seen how to install Enterprise Bacula exclusive graphical interface, the Bweb:
- Bacula Systems Repositories: http://bacula.us/bacula-enterprise-automated-install-script-for-centos-7/
- Ad Hoc Packages: http://bacula.us/bacula-enterprise-ad-hoc-centosrhel-7-packages-install/
Once installed and accessible through the standard HTTP port 9180, you can now use Bweb to administer and configure the EBacula system. It works in almost any Internet browser, has high performance and does not depend on Java or Flash plugins.
Here’s a guide to using Bweb, based on version 10.0.6 of the solution.
First Access (Bweb Configuration)
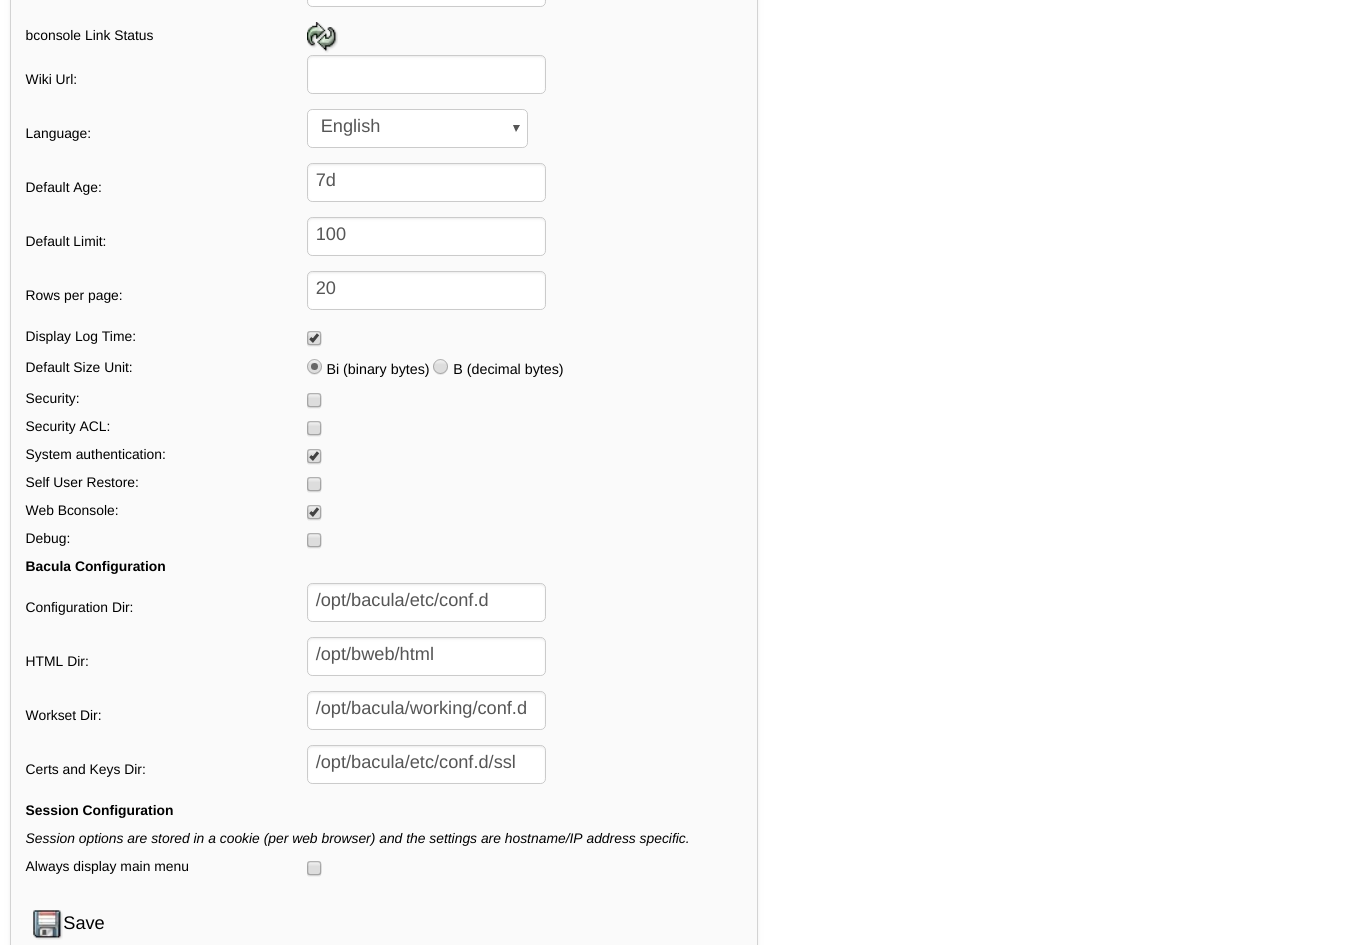
As shown in Figure 1, the first access to Bweb redirects to its configuration, with indication of the most trivial changes. You can return to it at any time, through the menu Configuration > submenu Configure Bweb, in the initial screen of the interface.
Here, the connection of Bweb to the Bacula database is also defined. If your database is PostgreSQL running on the same Bacula server, you don’t need to change anything. Otherwise, change as needed.
Still as shown in Figure 1, you can define the authentication method on Bweb and the use of ACLs (different permissions per user), but this will be seen below.
Figure 1. Bweb configuration screen.
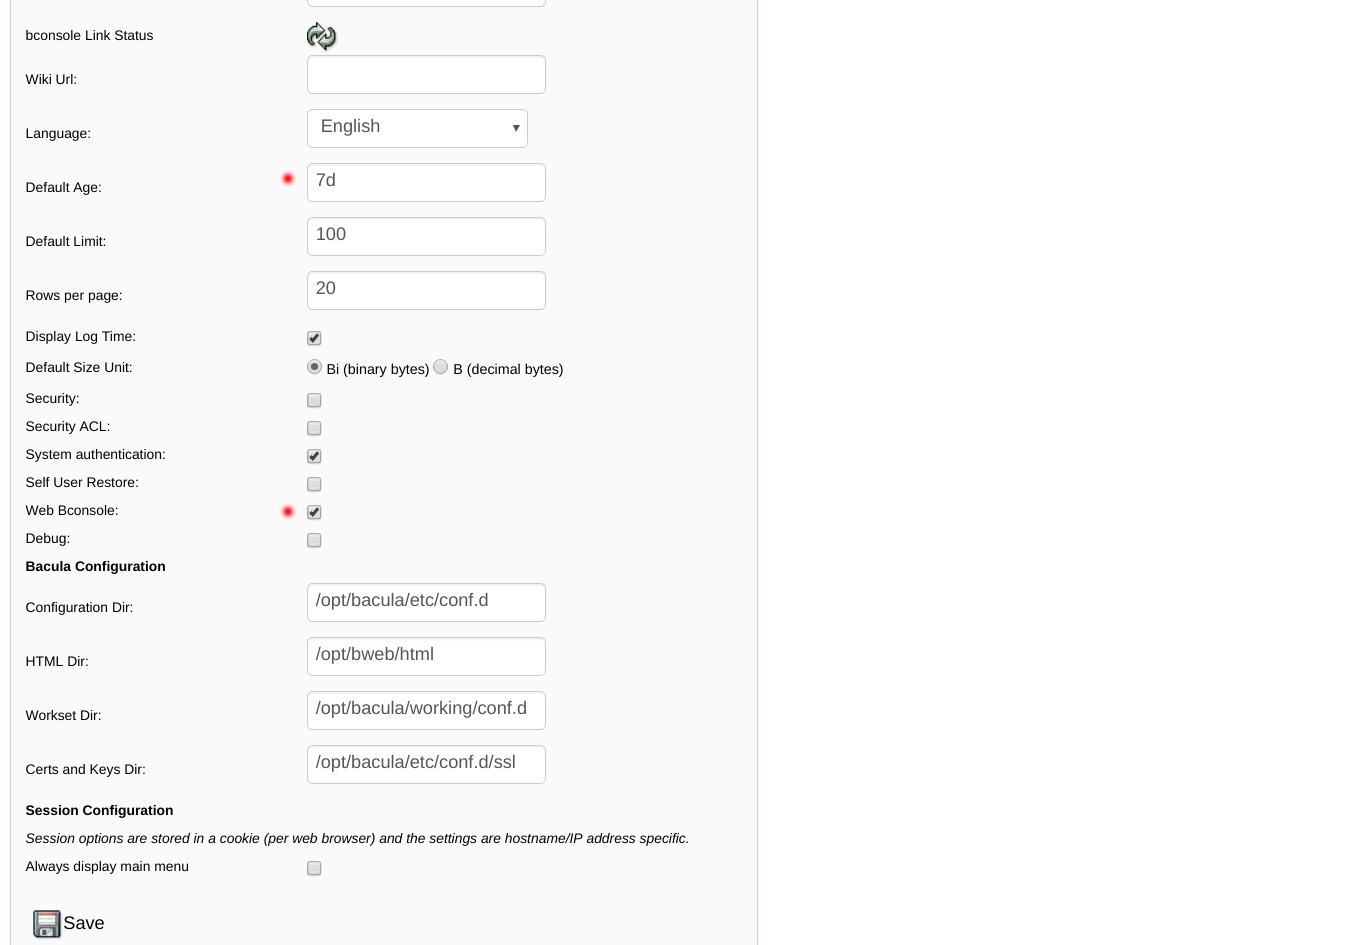
According to Figure 2, other options that you will probably want to change are the Language and enable Web Bconsole (CLI access from Bacula through the portal).
Figure 2. Change Language and Enable Web BConsole
Also on this same screen it is possible to define the authentication method in Bweb and the use of ACLs – different permissions per user, but this will be seen later.
Bweb Modules
Administration Module
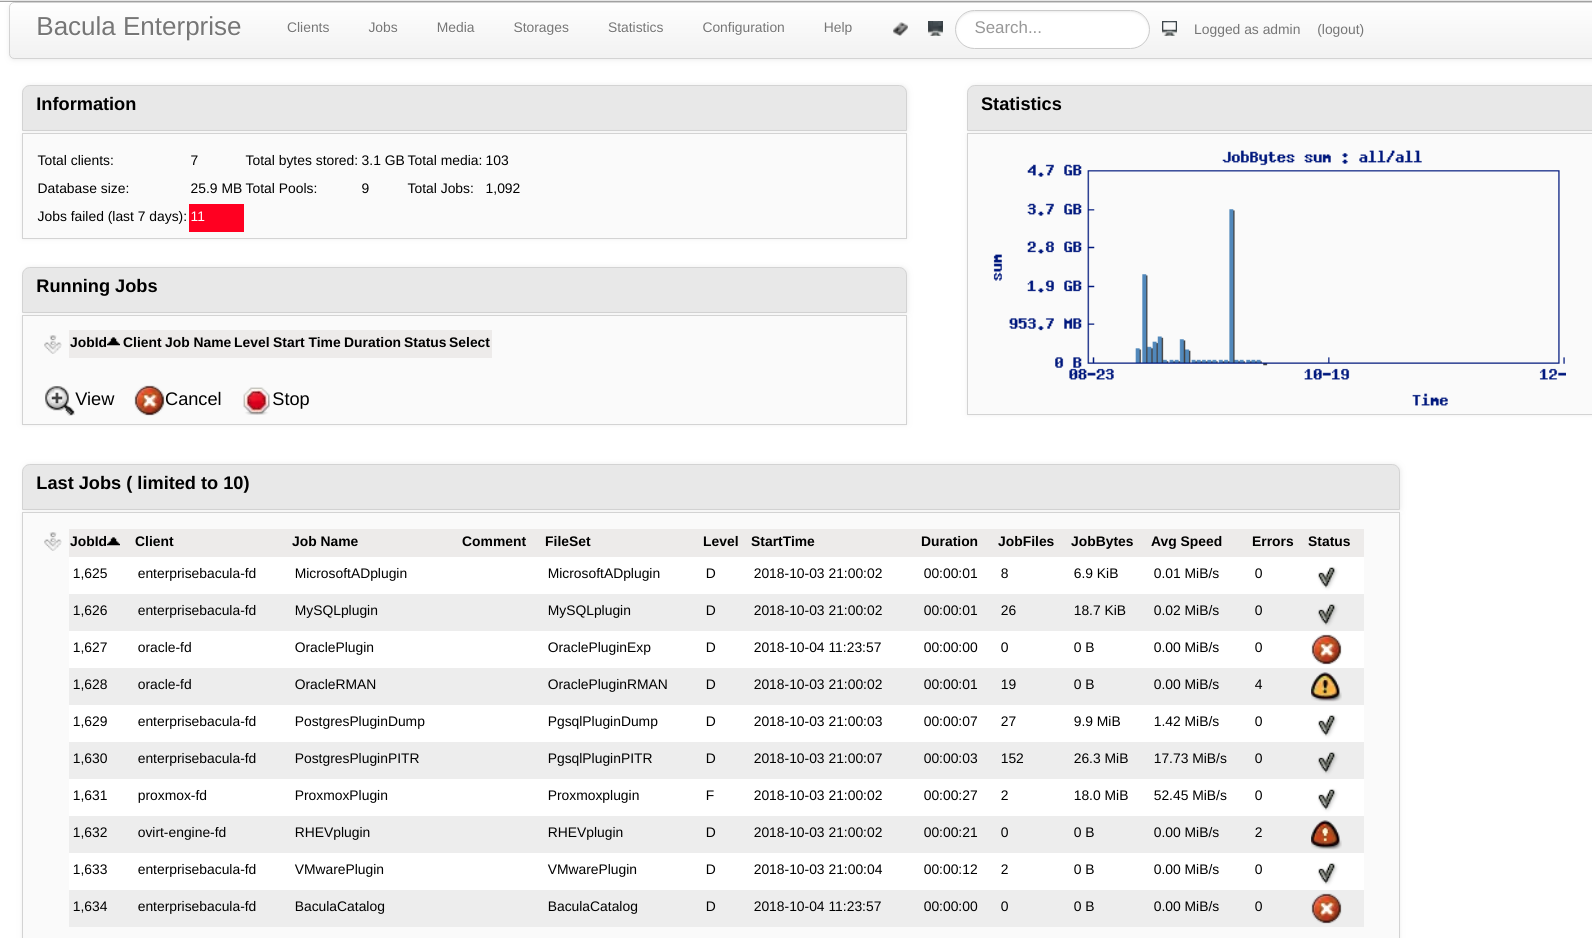
The Figure 3 displays the EBacula Administration Module, which is also the home page of the solution. In this module it is possible to run backup and restore jobs (including backups by plugins), re-run jobs with error, make the status and listing of customers, groups of customers, storage, backup volumes, information and global deduplication rate, robot manipulation tape, reports, create statistics graphs, manage users and access permissions to Bweb etc.
Figure 3. EBacula Administration Bweb Module
Configuration Module
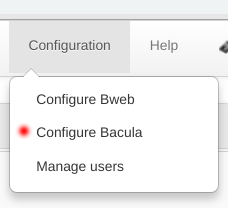
As shown in Figure 4, the initial screen of the Bweb (Administration Module) can be used to reach the EBacula Configuration Module.
Figure 4. Configuration Menu> Configure Bacula, Bweb home screen
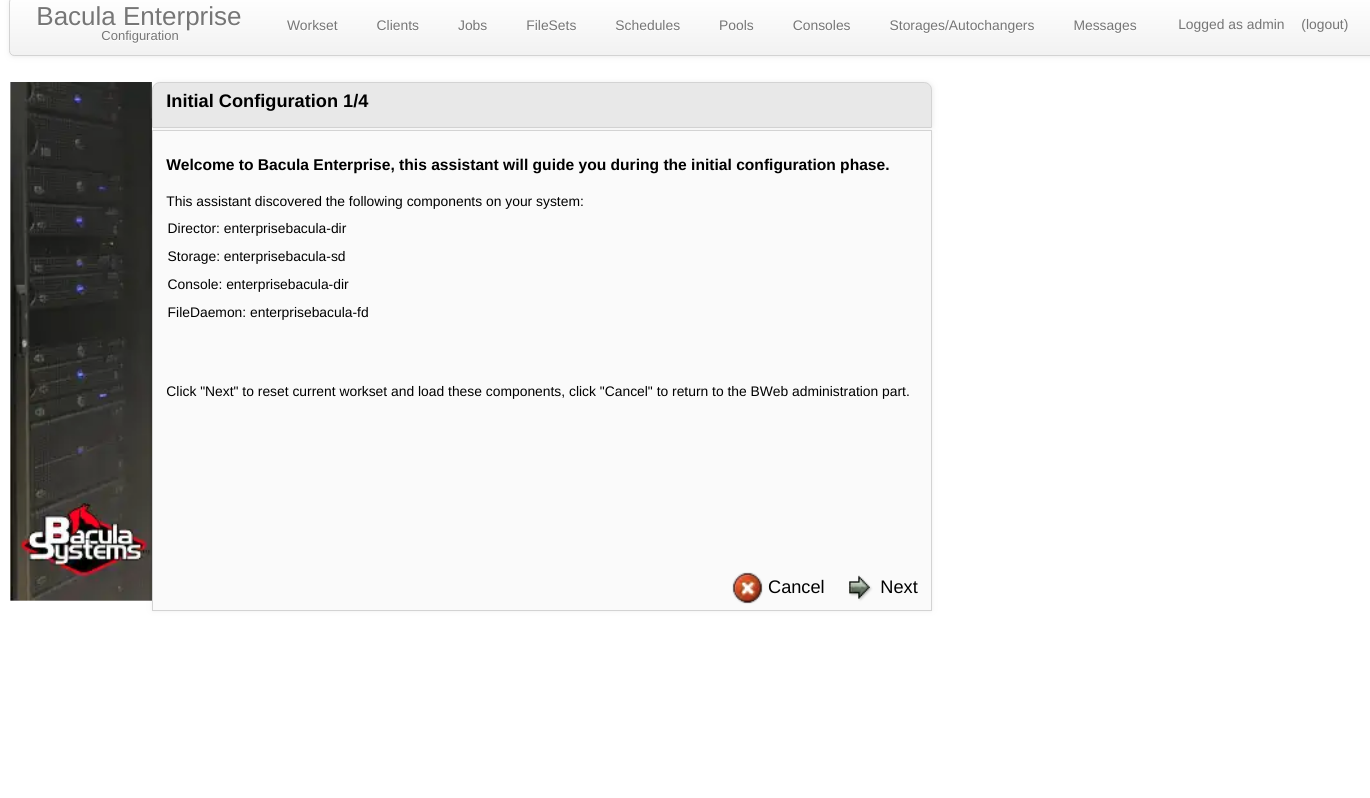
According to Figure 5, the first access to the Bweb will result in the first configuration of the module. The main result will be to split the configurations of Bacula’s local Daemons into a structure of folders and subfiles, one per configuration feature. It is possible not to run the wizard and continue to change the configuration files as single text files, but the administrator will lose all the benefits of using the EBacula Bweb Configuration Module.
Figure 5. First Access to Bweb, Initial Wizard
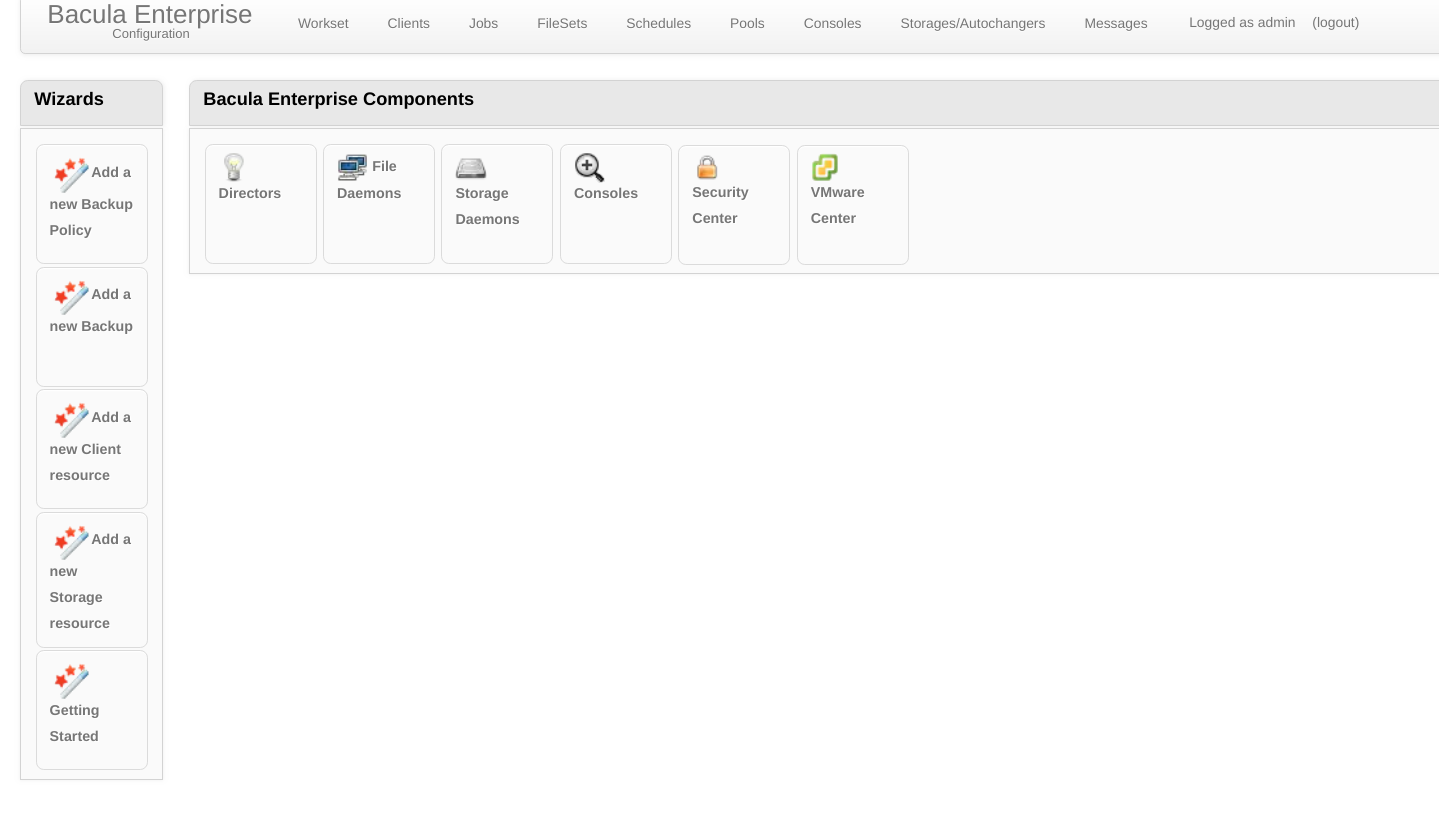
Finally, Figure 6 shows the buttons and menus of the EBacula Configuration Module. This Module will be detailed later in the specific Item.
Figure 6. EBacula BWeb Configuration Module
More details on each of the modules are seen below.
Administration Modules
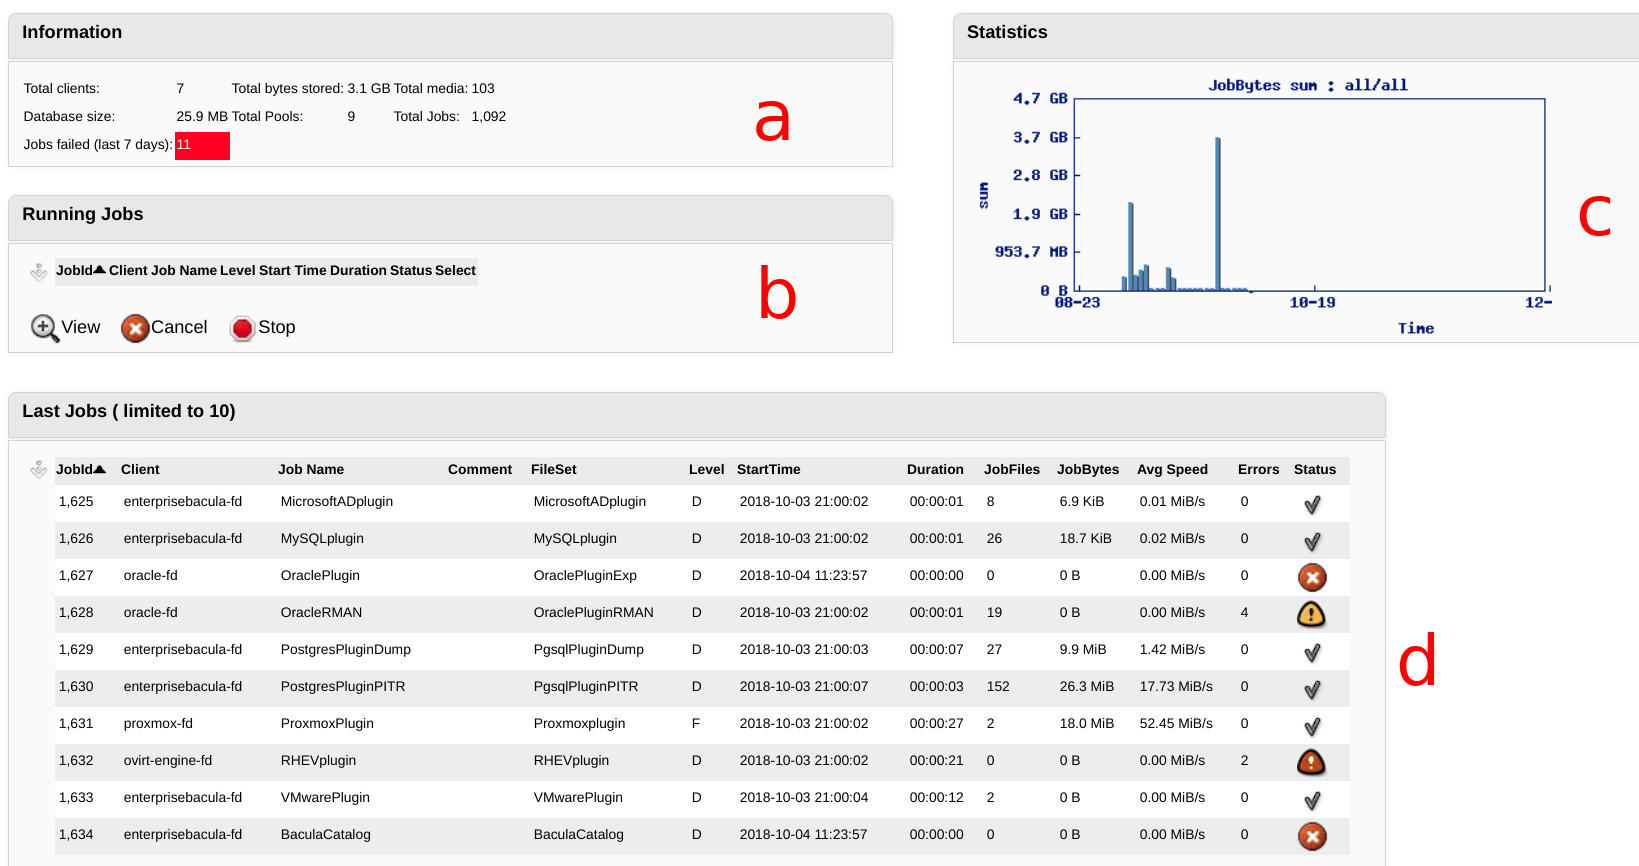
In accordance with Figure 7, the Bweb home screen currently has four widgets that the modem can be moved and resized according to the user’s wishes.
Figure 7. Dynamic Bweb widgets
The widget (a) in Figure 7 displays total system numbers, such as number of configured clients, sum of the size of all backups, size of the database (Bacula Catalog), pools, number of Jobs and Jobs with errors in the last few 7 days (in red). The latter can be clicked to expand the list of Jobs with a problem.
The widget (b) in Figure 7 displays the jobs that are running. There is a job status icon (running, waiting, etc.) that can be clicked for more information and actions on each Job. It is possible to Cancel one or a few jobs (definitively end) or Stop (Stop, the Job may be resumed at another time).
The widget (c) in Figure 7 shows a graph with the sum of the size of the backup Jobs over time. If clicked, it will take you to a list with the history of all Jobs with several possible filters.
The widget (d) in Figure 7 displays a list of the last 10 Backup Jobs. By clicking on the arrow (![]() ) it is possible to do a textual search on the information, display new columns or inhibit the current ones, and export the list in CSV format (all Bweb listings have these features). The icons on the right side of the widget connote the job’s termination status (OK, OK with alerts, Fatal Error etc.), and if clicked, it leads to the Job details, which allows you to see the job log and additional actions such as re-executing the same.
) it is possible to do a textual search on the information, display new columns or inhibit the current ones, and export the list in CSV format (all Bweb listings have these features). The icons on the right side of the widget connote the job’s termination status (OK, OK with alerts, Fatal Error etc.), and if clicked, it leads to the Job details, which allows you to see the job log and additional actions such as re-executing the same.
Administration Module Clients Menu
Clients Submenu
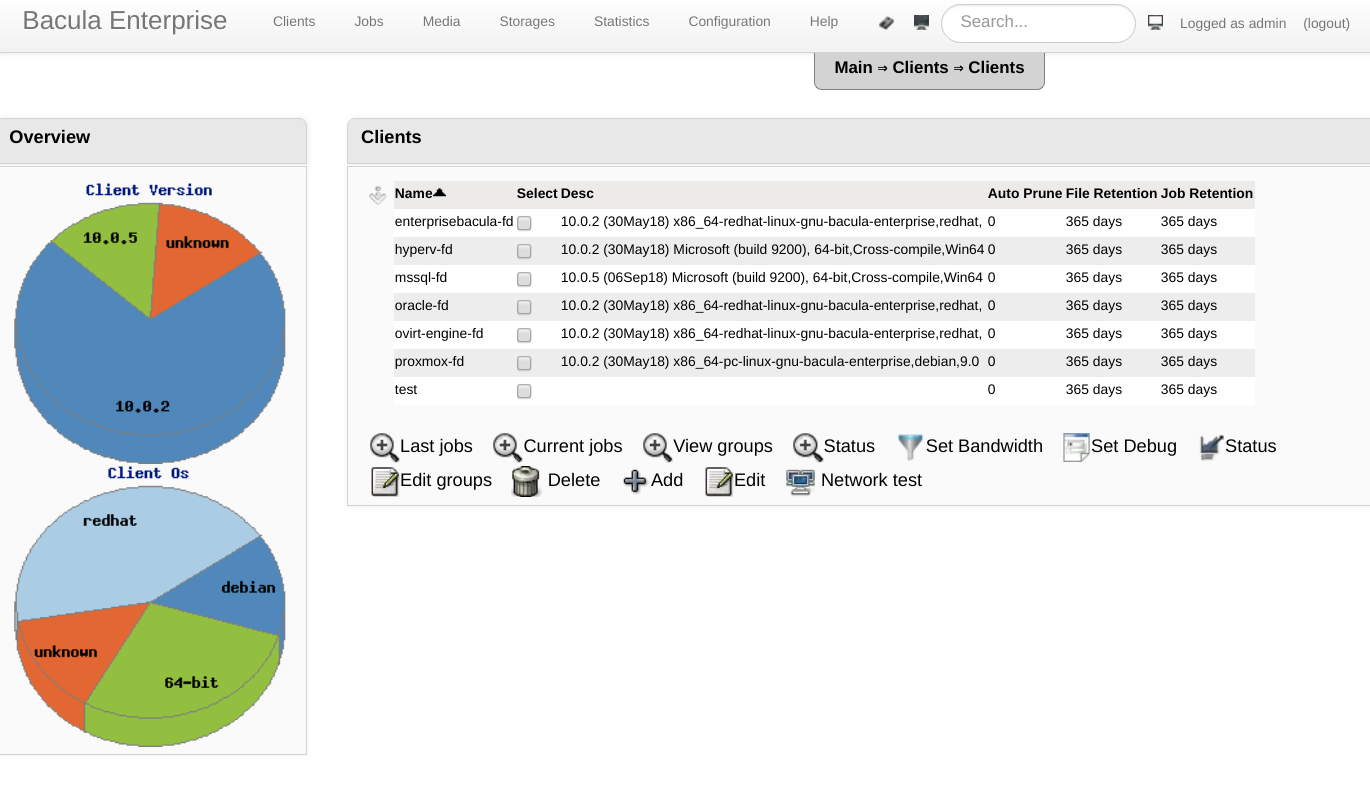
As shown in Figure 8, the Clients Submenu provides a list of registered Backup Clients and the retention times of the information in the Bacula Catalog (these retentions are not yet the retention of backups or volumes, they only limit the growth of the backup database. backup metadata). The buttons provide actions to list Jobs for the marked customer; Jobs running for a customer; customer groups; client status; bandwidth limit for each client; set the client’s debug mode; graphical status of the client; edit customer groups; delete Customer information in the Catalog (requires that it is no longer in the Bacula settings); add new Client by wizard; edit a customer’s settings; perform performance testing on traffic to and from the customer. The latter is quite useful for identifying bottlenecks and mitigating slow jobs in backup.
Figure 8. EBacula Bweb Administration Module Customers Submenu
Groups Submenu
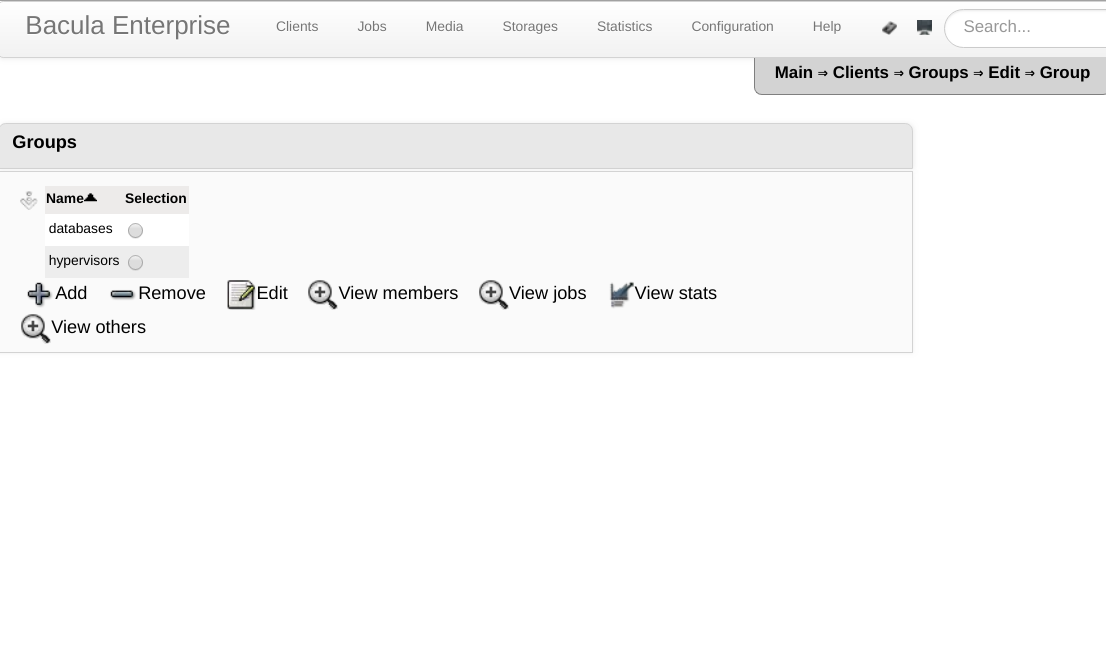
According to Figure 9, the Groups Submenu allows the creation of sets of backup Clients for the purposes of statistics, filtering and better visualization of a large number of Clients. You can create and remove groups; add or remove Clients from groups; list only jobs in a group; view statistics and graphs for just one group.
Figure 9. EBacula Client Groups Submenu
Administration Module Jobs Menu
Defined Jobs Submenu
The Defined Jobs option allows the execution of separate Backup Jobs, typically when the administrator wants to execute a Backup Job or to re-execute a failed Job, as normally the Jobs should already be automatically executed according to the schedules that will be defined in the Configuration Module.
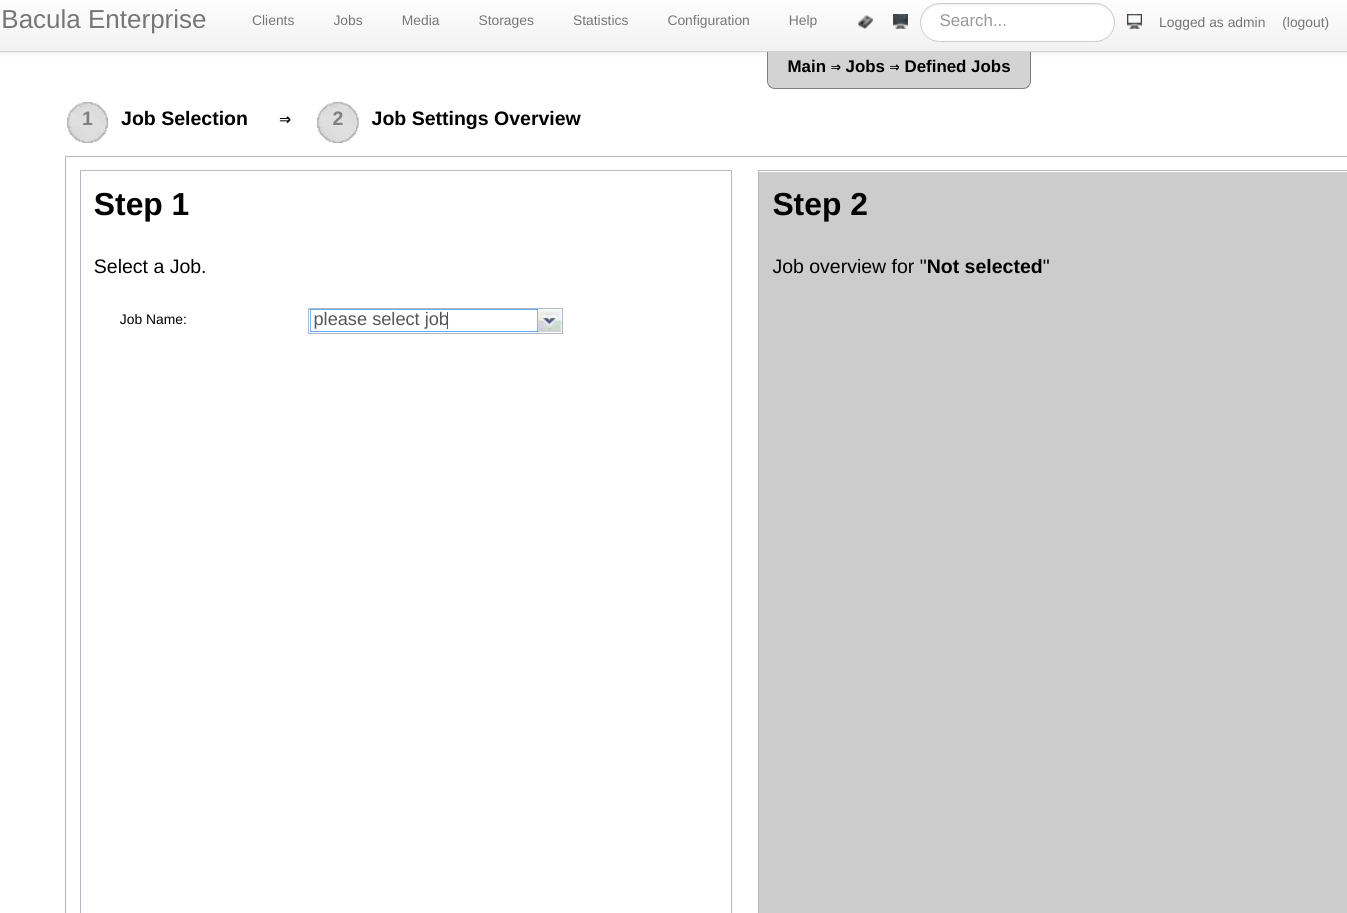
Figure 9 shows the first screen that contains a combo box with the Jobs already configured in EBacula. In this same box it is possible to do a textual search for the name of configured Jobs.
Figure 9. Job Execution Selection
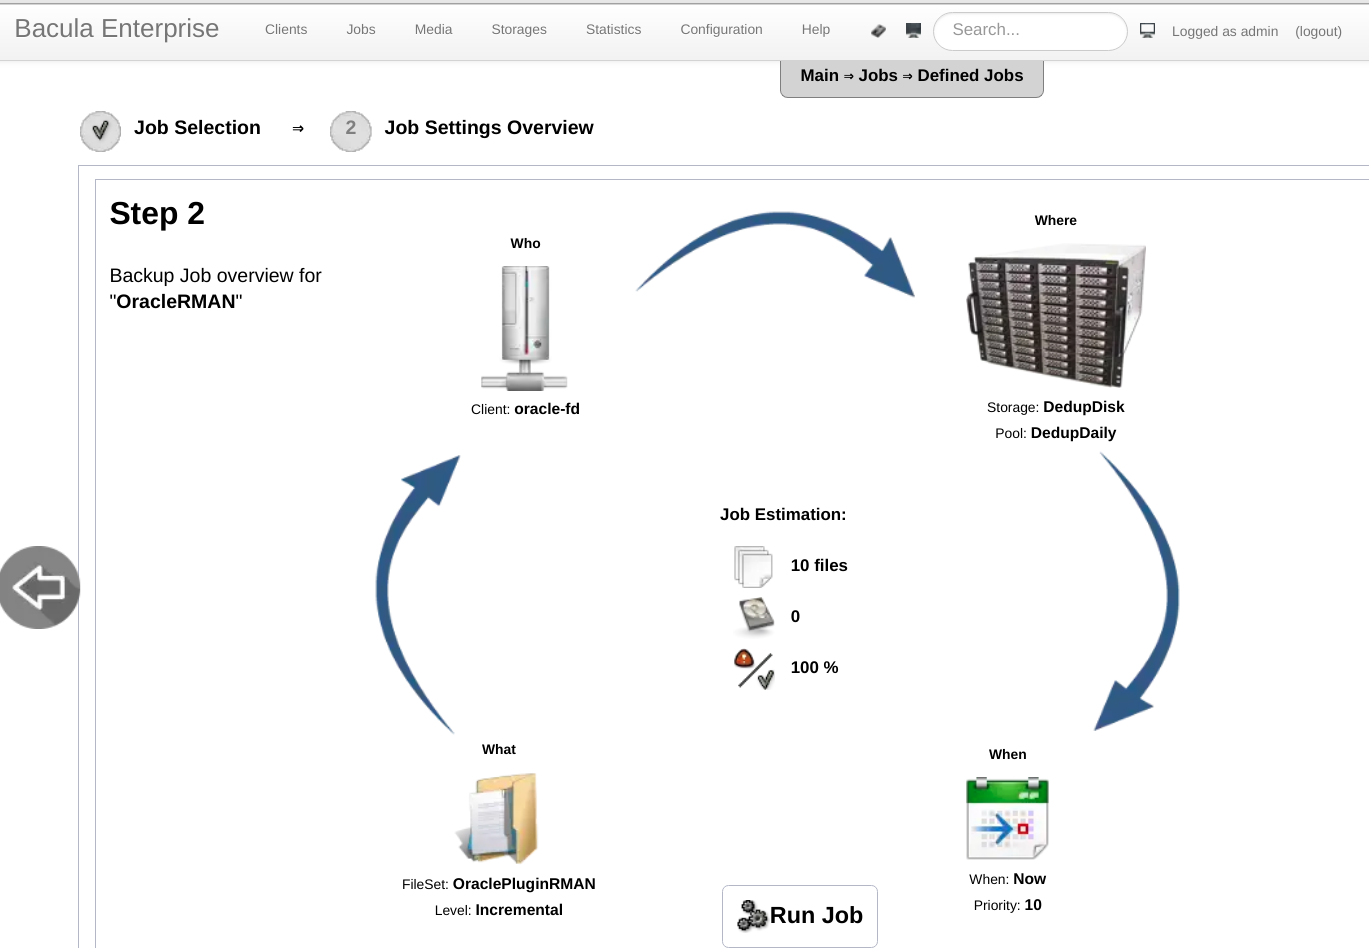
Figure 10 shows the options for running the Backup Job. It is possible to change the Backup Client, Pool and Storage, FileSet (backup content) and level (Full, Differential, etc.), and the Job start time.
Figure 10. Single Backup Job Execution Options
Job History Submenu
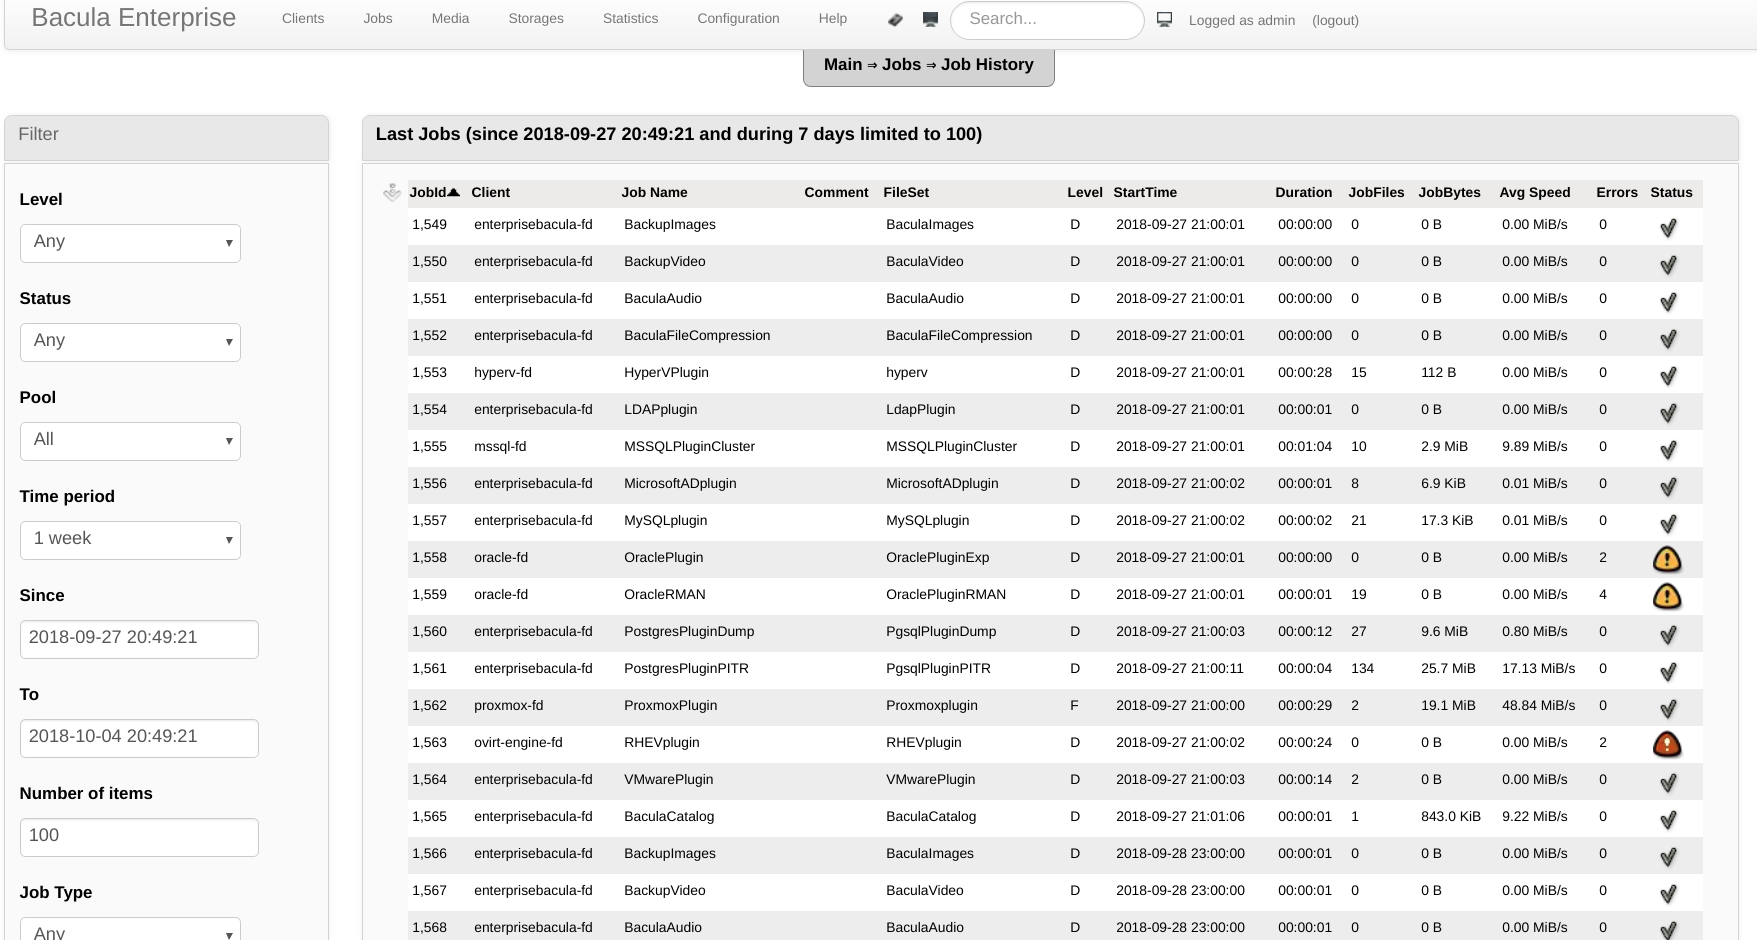
Depending on Figure 11, the Job History screen provides a report of all jobs done by Bacula. It is possible to reorder, apply several filters, in addition to being able to inhibit or display other columns to export the information in CSV by clicking on the arrow (![]() ) in the upper left corner of the list. By clicking on the status icons on the right side of the list, it is possible to enter the details of each Job, being able to view the log, list the files of each Job, re-run or even restore from the Job.
) in the upper left corner of the list. By clicking on the status icons on the right side of the list, it is possible to enter the details of each Job, being able to view the log, list the files of each Job, re-run or even restore from the Job.
Figure 11. Job History Submenu
Jobs by Group Submenu
According to Figure 12, the Jobs by Group screen shows a statistical report of the jobs summarized by the groups of Customers created by the administrator.
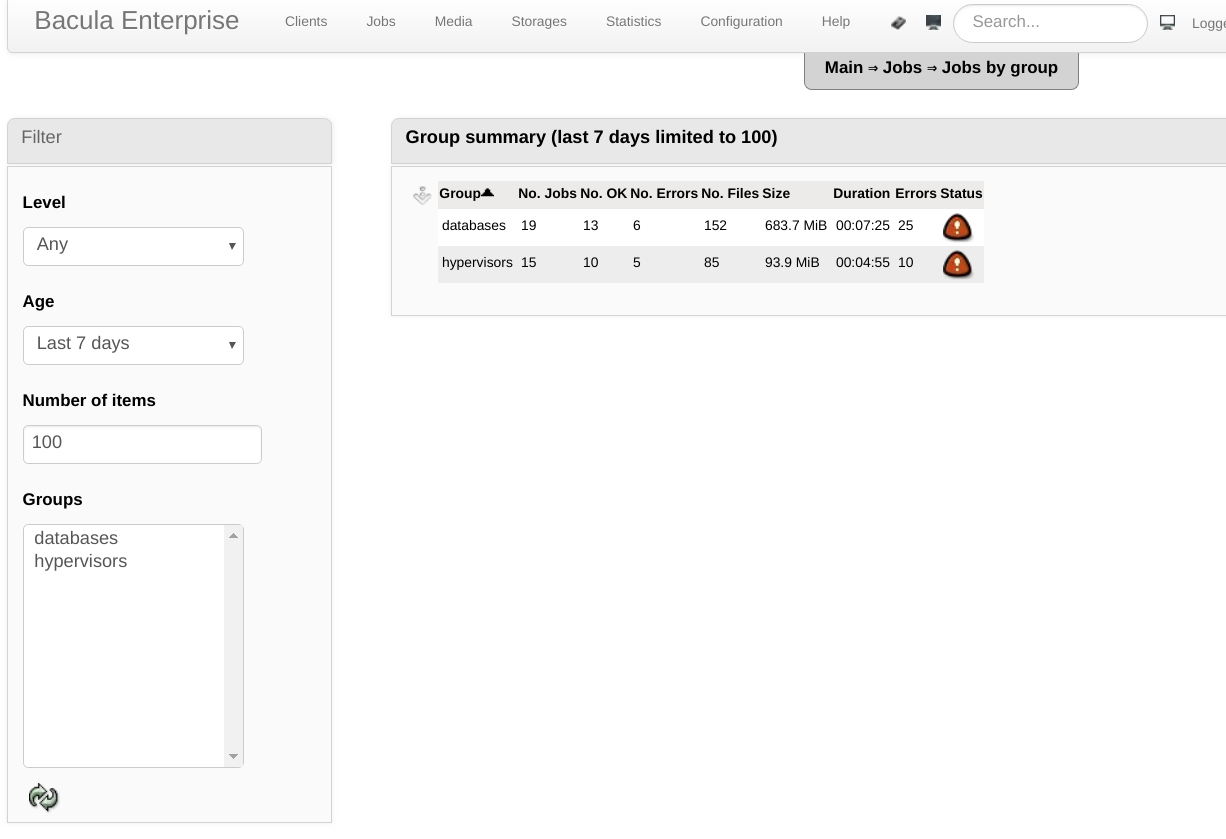 Figure 12. Jobs by Group Report Screen
Jobs Overview Submenu
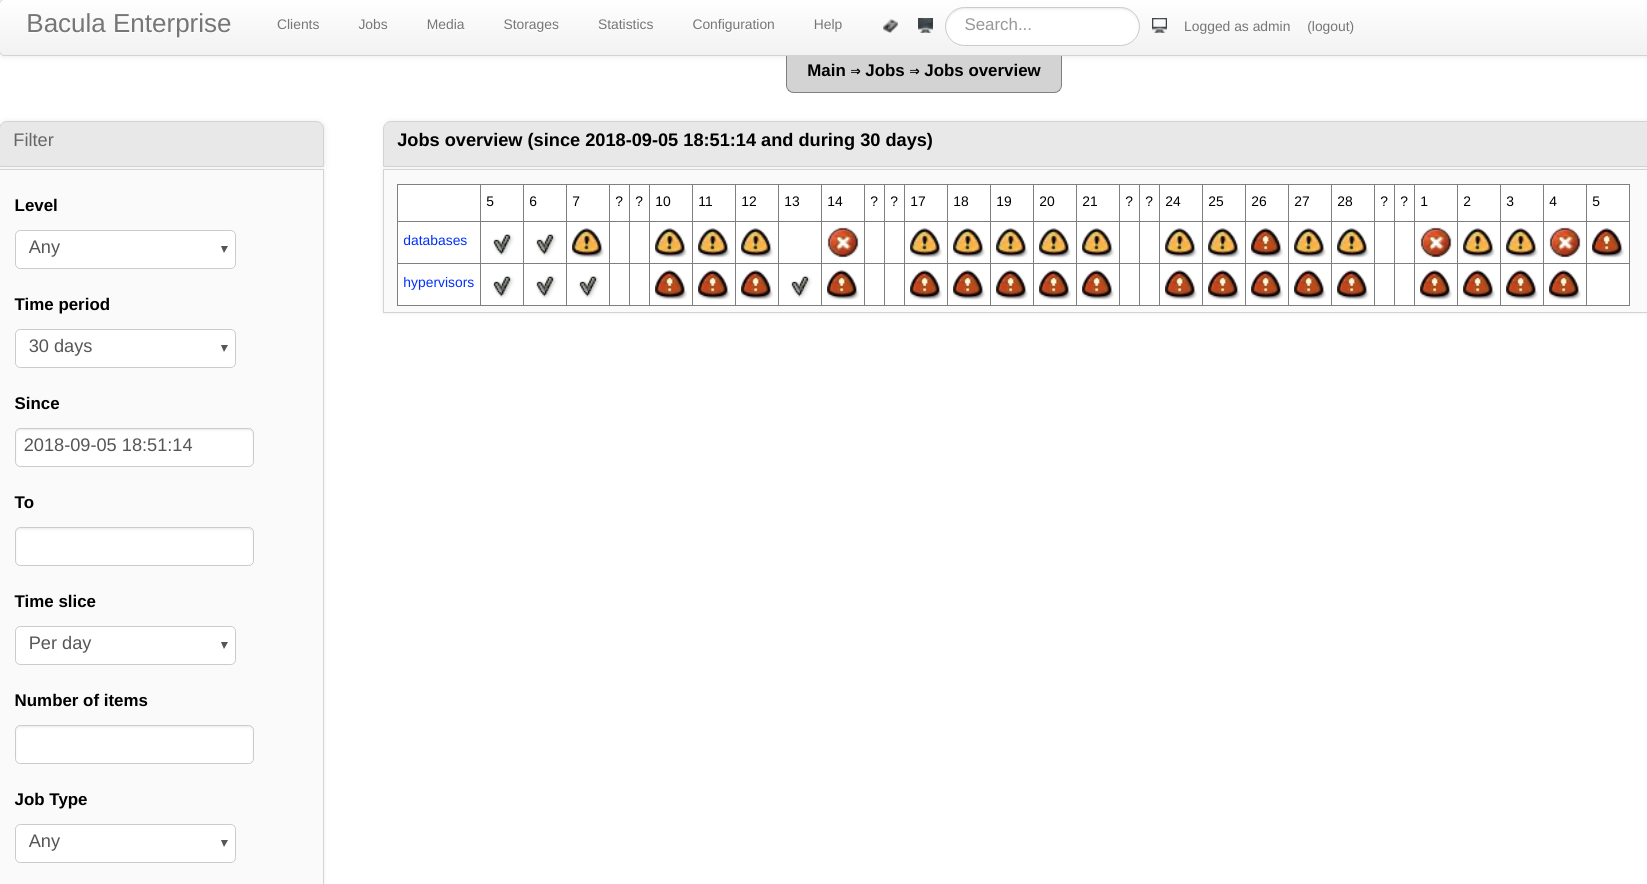
As in Figure 13, the Jobs Overview screen shows a summary graphic dashboard of OK jobs, with Alerts and with Fatal Errors over time and categorized by groups of Clients, good to complement the monitoring of backups. The time lapse shown is customized, as well as several filters can be applied.
Figure 13. Jobs Overview Screen
Missing Jobs Submenu
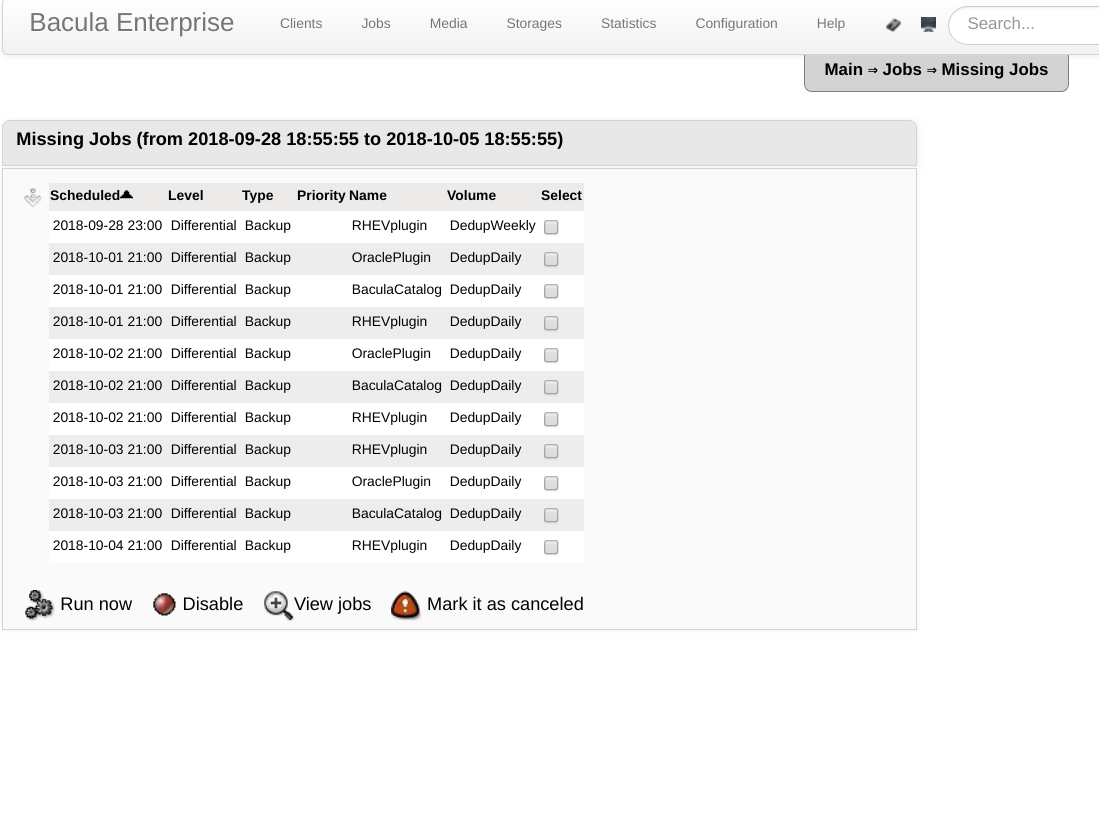
In accordance with Figure 14, the Missing Jobs screen displays a report of jobs that should have been performed by Bacula’s agenda but that, for some reason, have not been completed. You can re-run them, disable them (remove them from the schedule) or delete them from the report by clicking the “Mark as Canceled” button.
Figure 14. Bweb Missing Jobs screen
Running Jobs Submenu
As shown in Figure 15, the Jobs running screen shows only those in progress at that time, useful for a monitoring dashboard.
Figure 15. Bweb Running Jobs screen.
Next Jobs Submenu
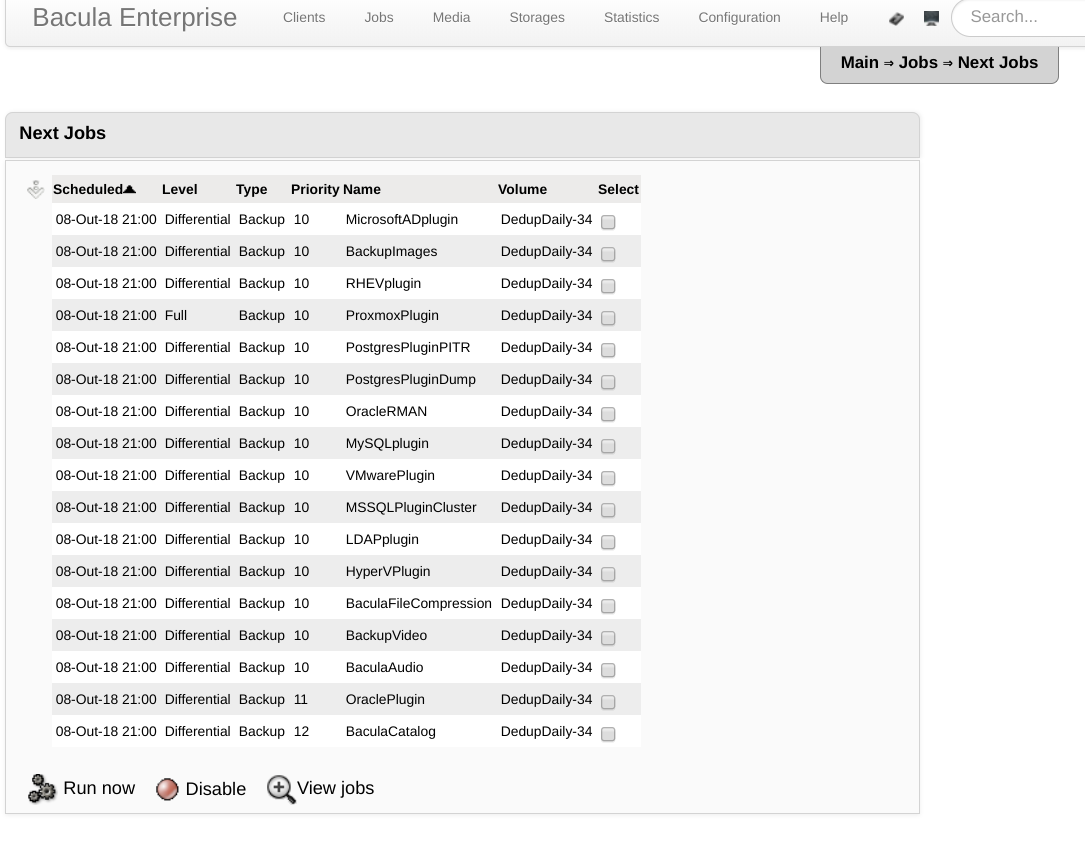
According to Figure 16, the Netxt Jobs screen shows jobs scheduled for the upcoming 24 hours. It is possible to disable some, for example, if you know that some condition will prevent one or more backups from running correctly. It is also possible to obtain a list of finished jobs of the same type.
Figure 16. Bweb Next Jobs Submenu – Upcoming Scheduled Jobs
Web Restore Submenu
This is perhaps the most important and valuable menu on Bweb. Through it it is possible to restore files and data from backups made through plugins.
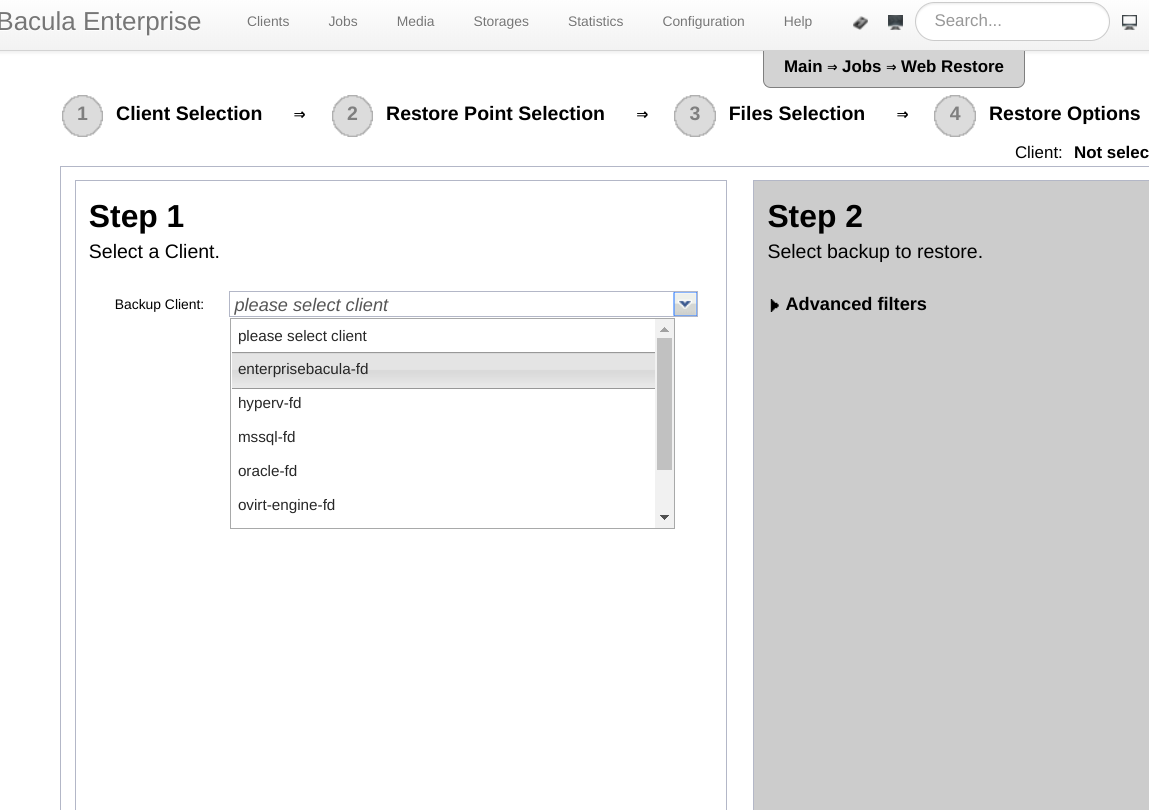
As shown in Figure 17, the Web Restore screen starts by asking which of the configured Jobs will be restored. You can select through a combo box or search textually in the same field.
Figure 17. Job – Web Restore, Job Selection
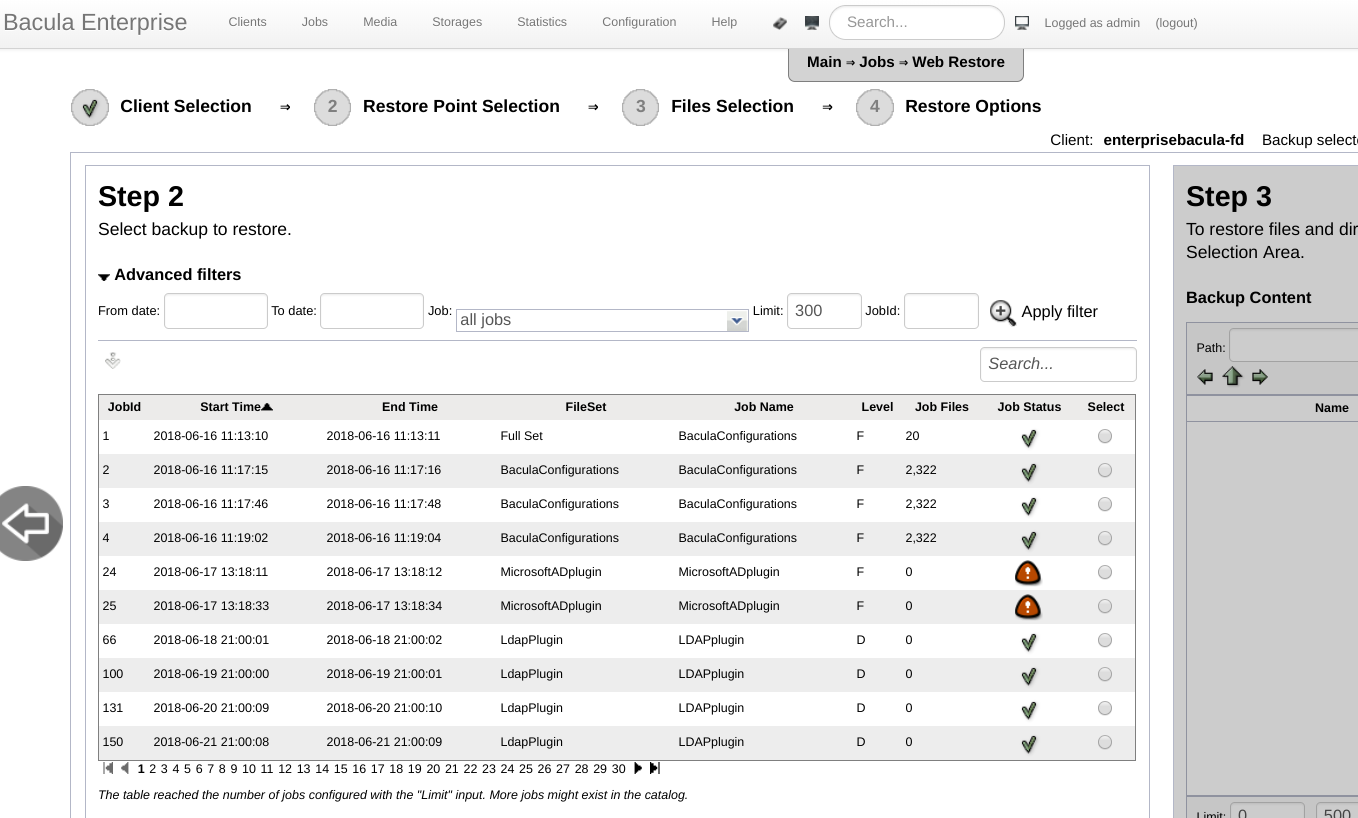
Depending on Figure 18, the Step 2 asks you to choose within the configured Job which finished job will be used for the restoration. You can filter by time period, reorder the listing, insert a specific JobID you want to restore, among other functions.
Figure 18. Job – Web Restore, Selection of Finished Job
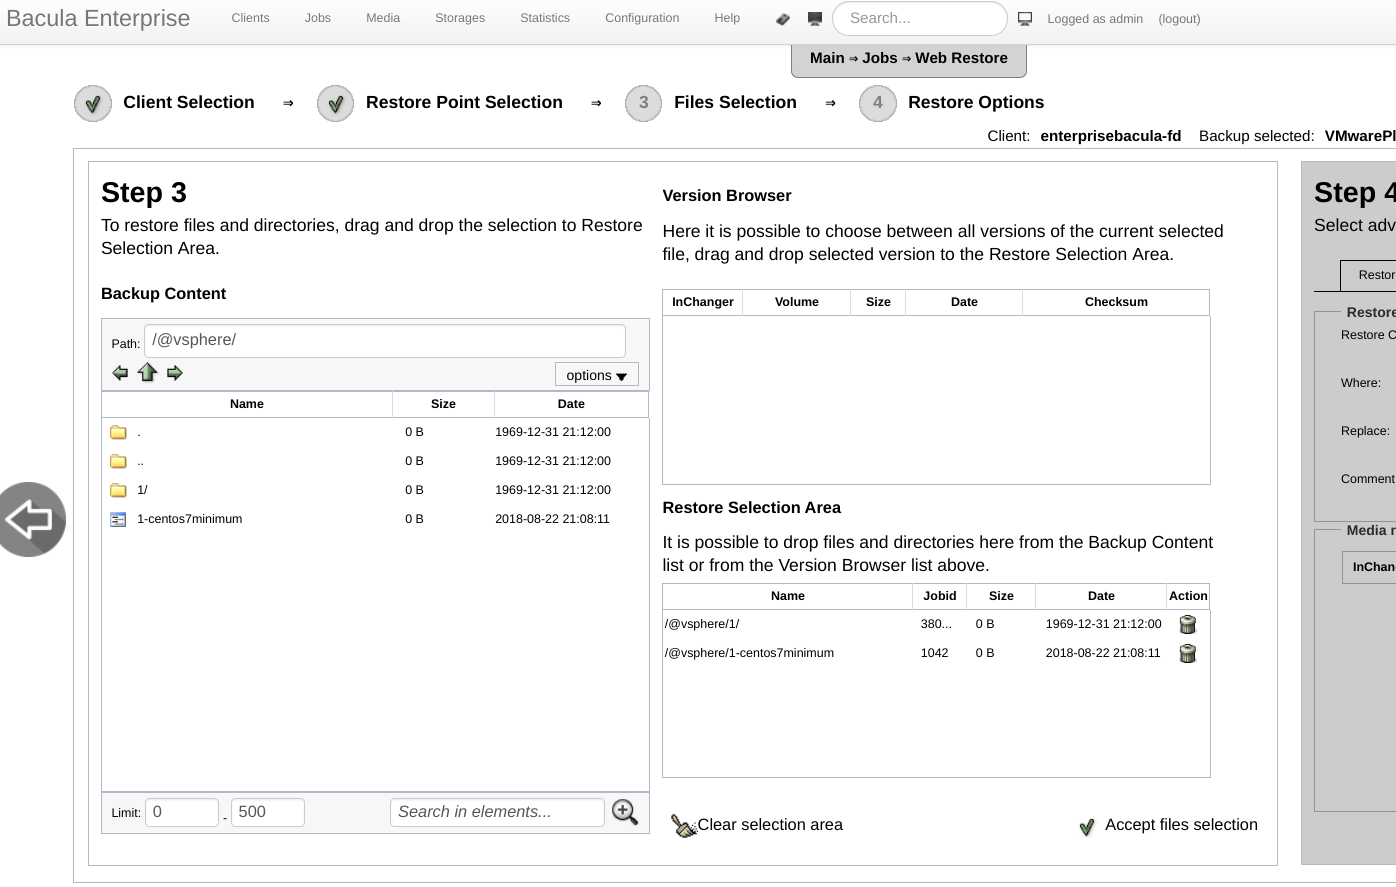
According to the Figure 19, it is time to choose which folders and files will be restored. Just click on them and drag to the lower right side frame. As in this example I am restoring a backup made through a plugin (VSphere), the folder at the root starts with @ (@vsphere). To restore a VM (either to disk or to a VSphere ESXi node), it is necessary to mark the file with the name of the VM and the folder containing the disk, configuration and other data on it. The other plugins operate in a more or less similar way, and details about their restoration processes can be found in their specific chapter.
Figure 19. Job – Web Restoration, Restore Content Selection
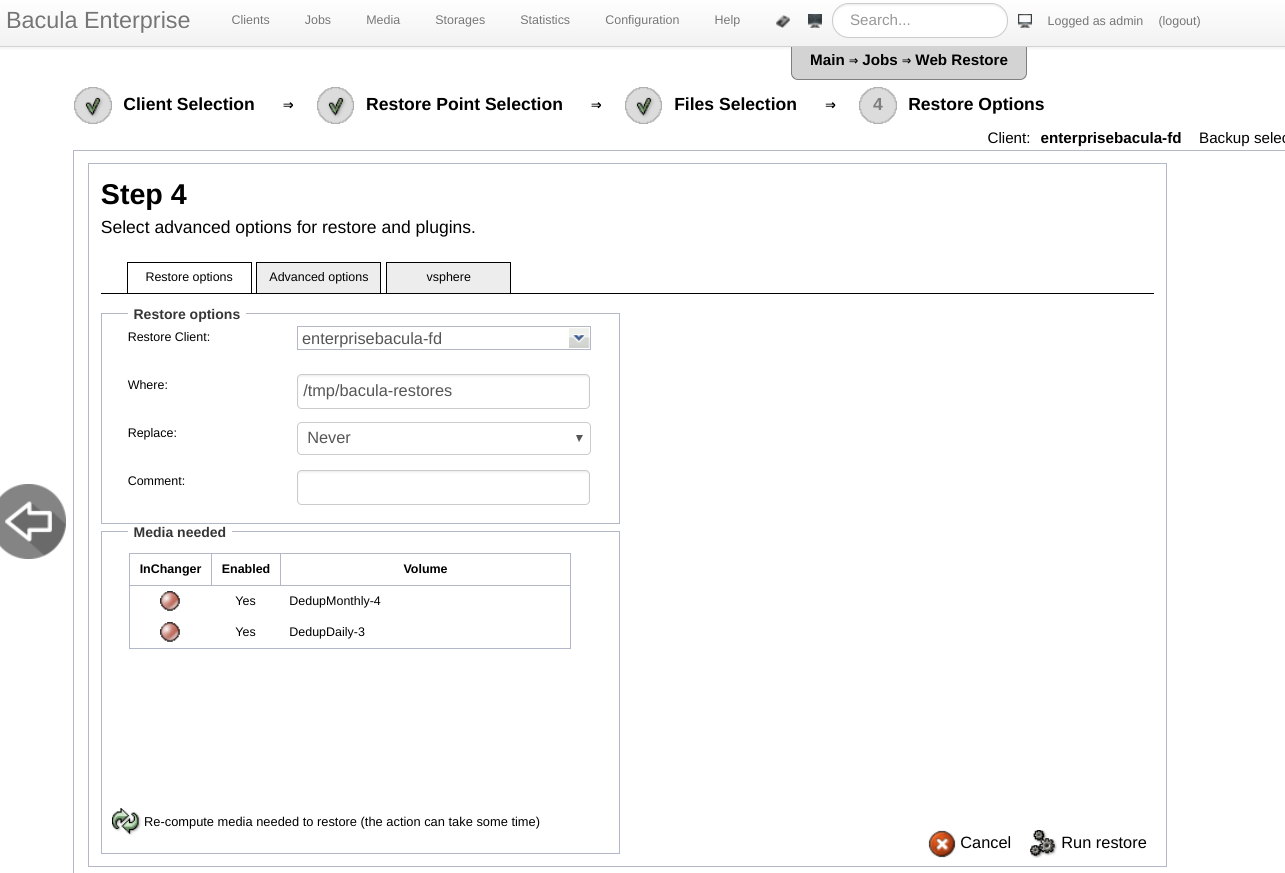
Given what is shown in Figure 20, the final options for restoration follow. The Restore Client is the configured Bacula Client that will save the restore data (yes, you can backup one Client and restore it to another). The Where option will be the Customer’s directory in which the data will be restored. If it does not exist, this directory will be created automatically. If it is a data backup made through a plugin, any directory specified in the where option causes the data from the plugin’s backup to be restored to disk in this directory (eg the disks and configuration files of a VM, the dump of a MySQL database, etc.). If you want to restore the VM directly to a hypervisor or the database for the bank’s management service, just leave the Where blank or slash “/” (root), and also modify the desired options in the specific tab of the plugin that will open when appropriate.
Figure 20. Web Restore, Options and Restore Confirmation Screens
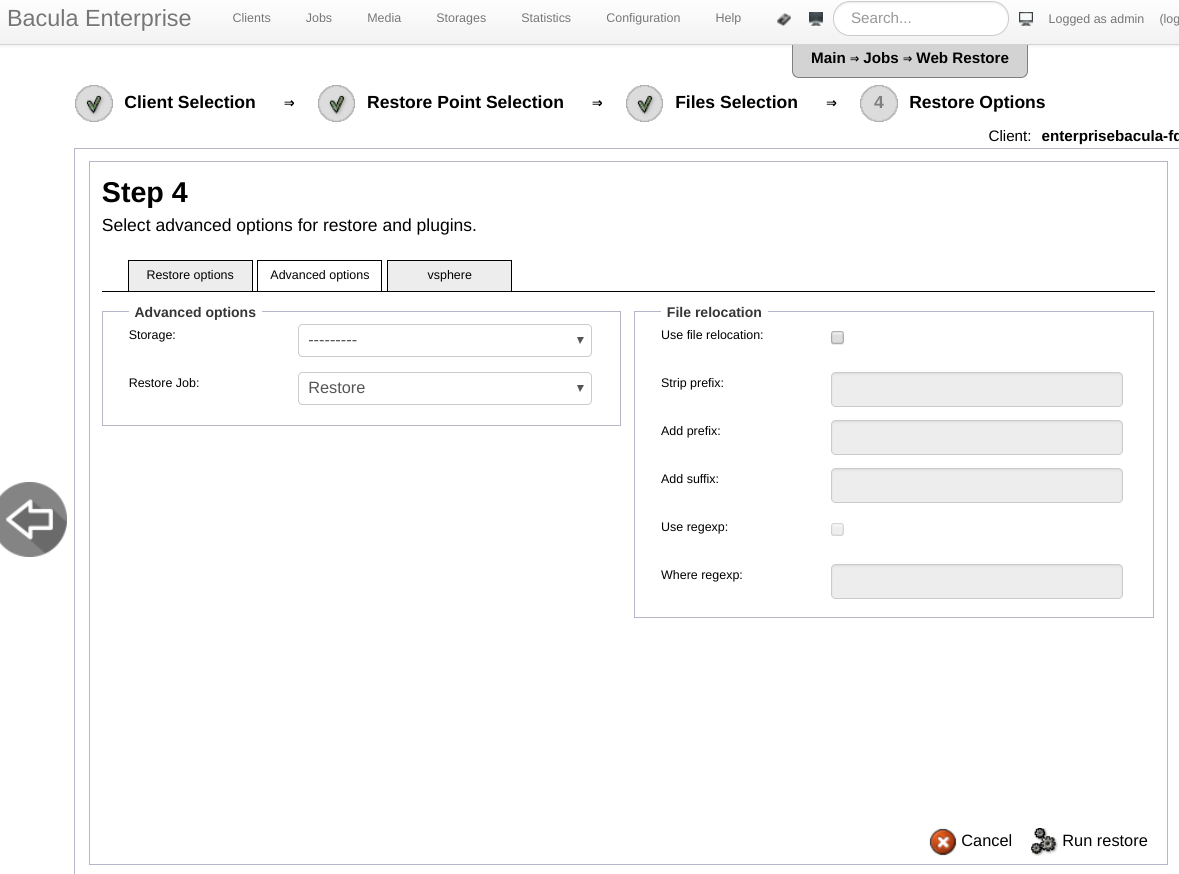
As far as Figure 21 is concerned, the Advanced Options tab (second) offers more situational options. You can modify the default Restore Storage and Job (which is unlikely to be necessary), or use file relocation when restoring (eg, removing directories in the full path to the restored files, adding a suffix to the restored files – e.g. .restore).
Figure 21. Web Restore, Advanced Options Tab on Restore Confirmation
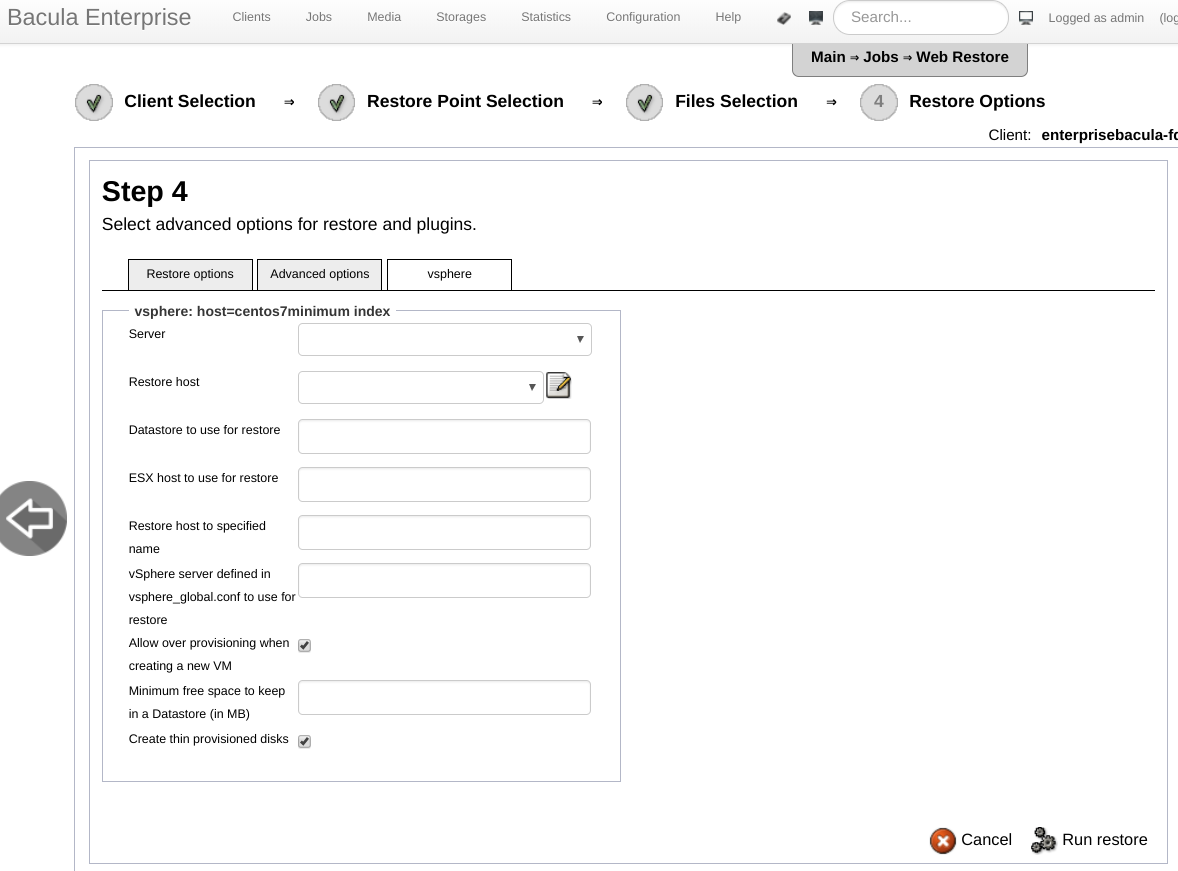
Figure 22 shows the restore options for the plugin used in the backup, if applicable. In the example of the VSphere Plugin, it is possible to modify the VCenter, ESXi or restore datastore. You can also rename the restored virtual machine, in addition to other options. Each plugin has specific restoration features, which are covered in the Chapter that talks about them. The “Run Restore” button starts the Restore Job.
Figure 22. Web Restore, Plugin Restore Options when used in Backup
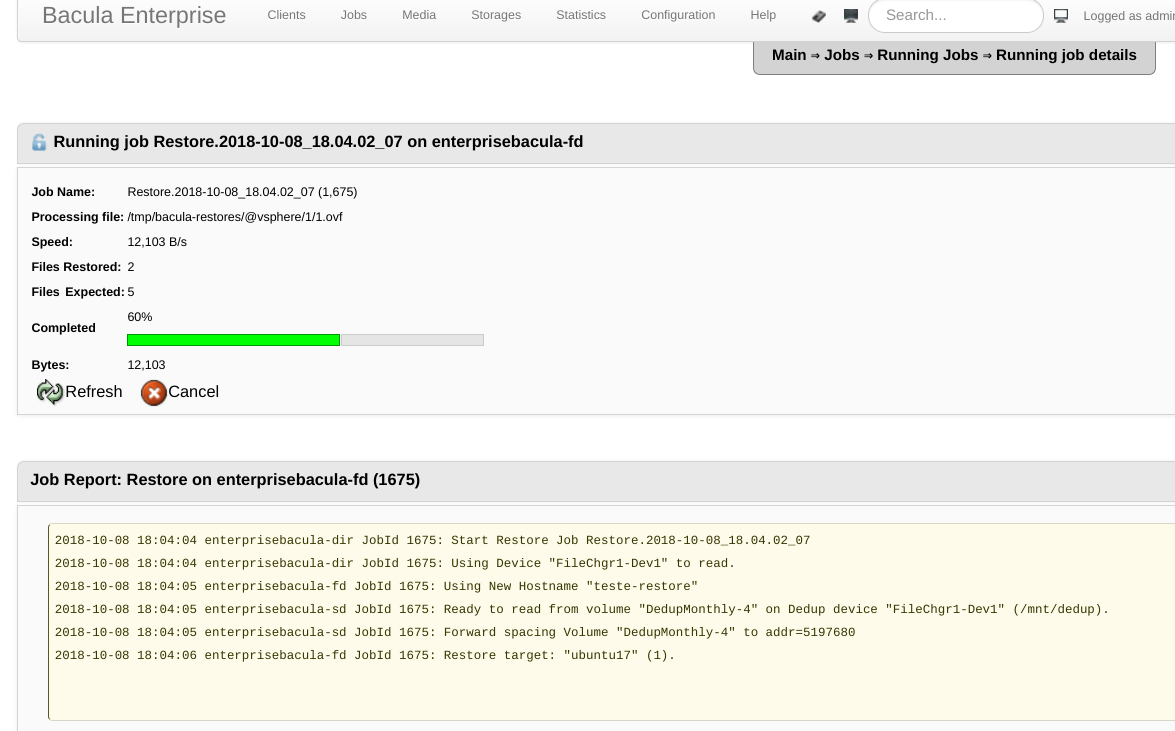
To conclude, as shown in Figure 23, Bweb will open the details page of the Restore Job, with progress bar, statistics and log messages below.
Figure 23. Web Restore, Restore Job Details
Single-Item Exchange and VMware Restore Submenus
The Single-Item Backup Plugin (which runs on the Storage Daemon machine) allows the granular restoration of Exchange Mailboxes and Files from within VMware virtual machines. It is necessary to have Bweb installed on the same machine as the SD to use this feature.
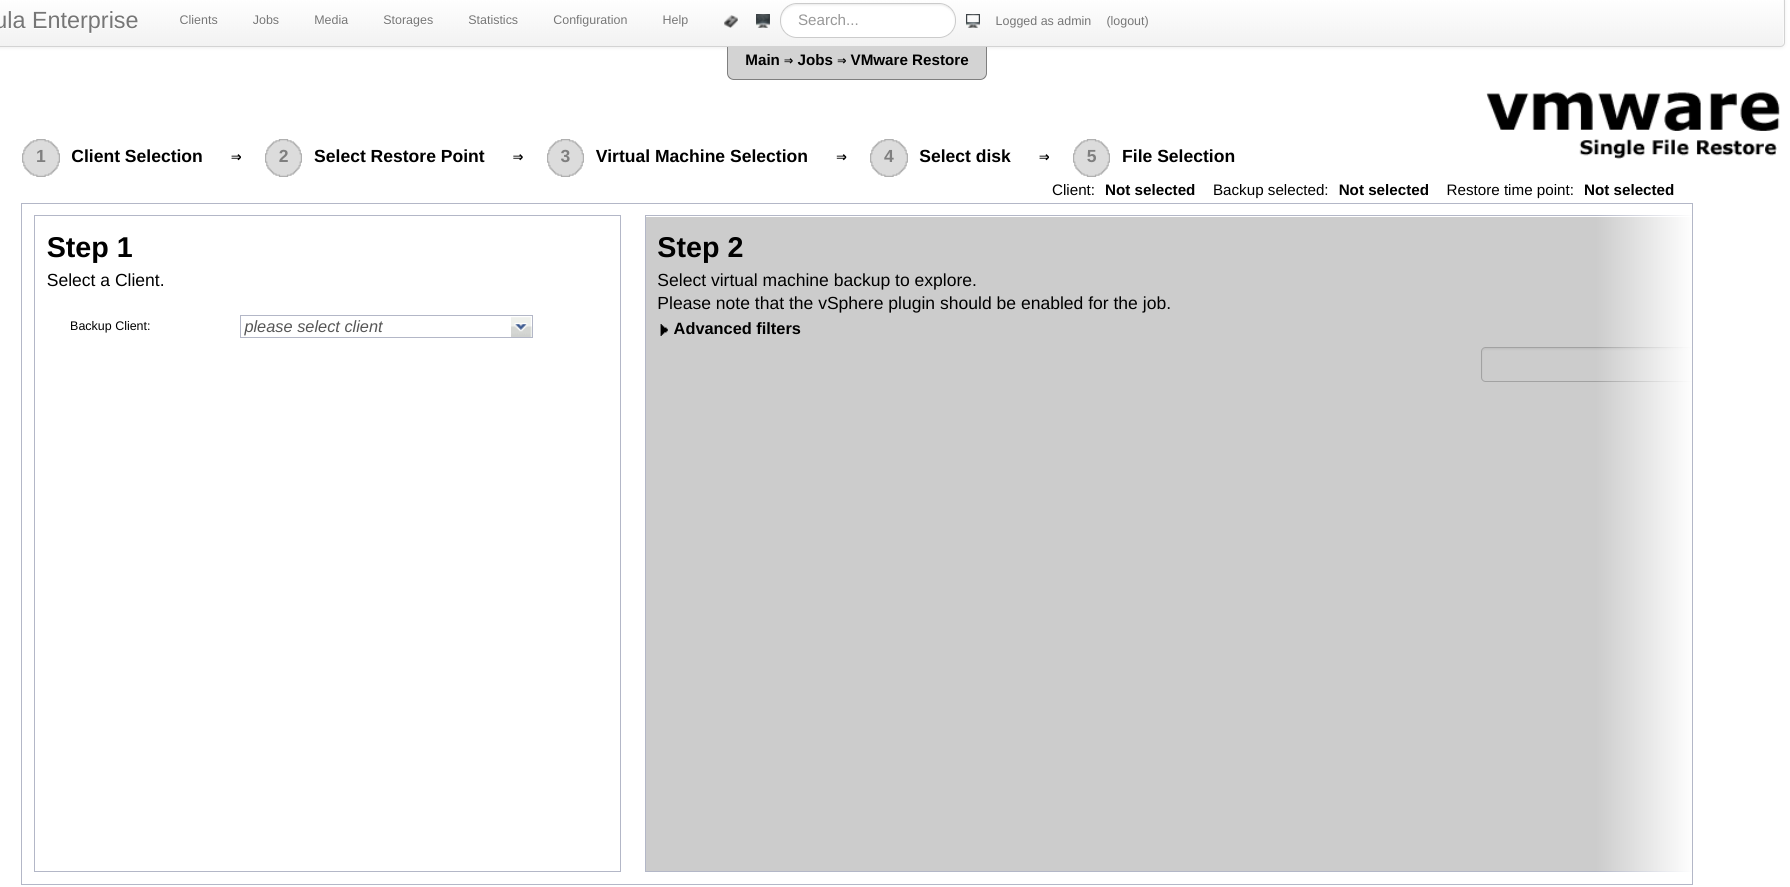
In accordance with Figure 24, the first step of the Single-Item granular restoration is to choose the client that made the backups of Exchange or VMware. You can choose from the combo box or enter a text search term.
Figure 24. Single-Item Exchange and VMware Restore Submenus, Client Selection
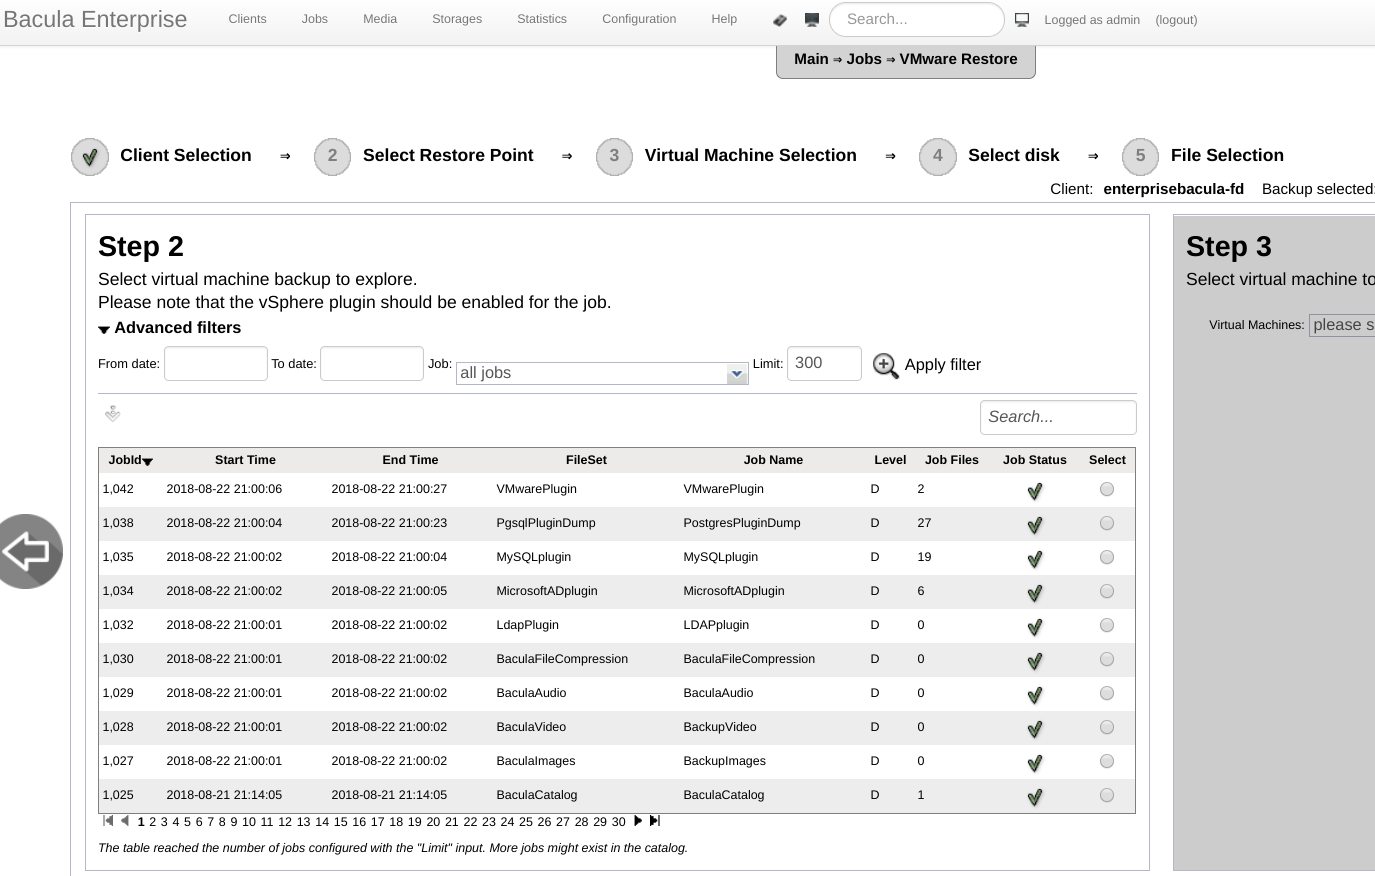
As shown in Figure 25, the Step 2 consists of choosing a finished Exchange Backup Job or a VSphere VM to restore. It is possible to filter by dates, by configured Job, do a text search, reorder the list of Jobs, among others.
Figure 25. Single-Item Exchange and VMware Restore Submenus, Job Selection
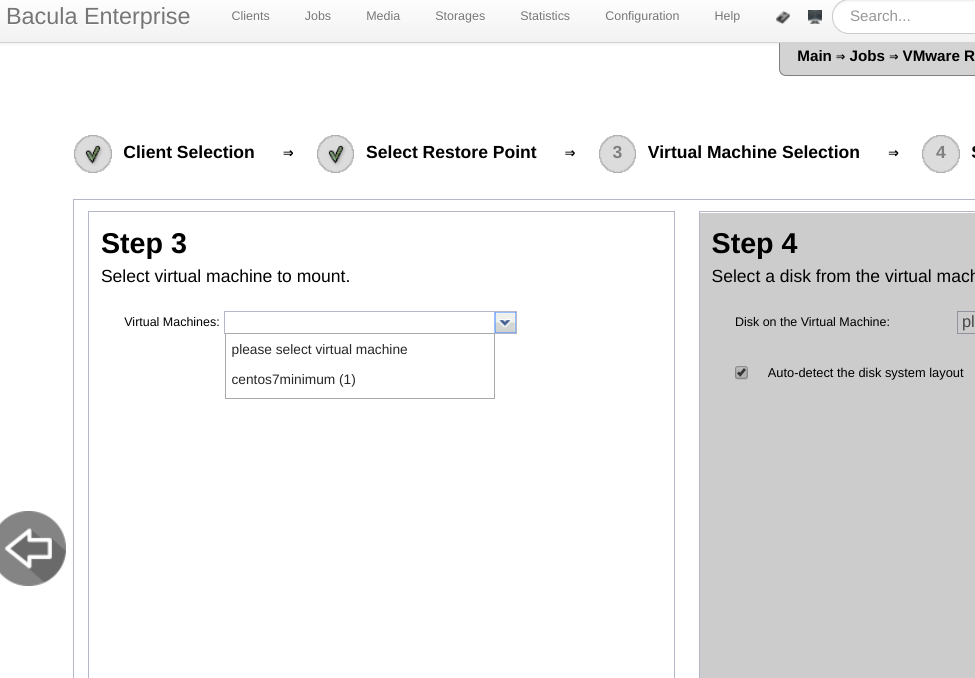
As shown in Figure 26, select the Mailbox you want to restore for Exchange, or the VM you want to restore for VMware.
Figure 26. Single Item Exchange and VMware Restore submenus, Mailbox or VM Selection
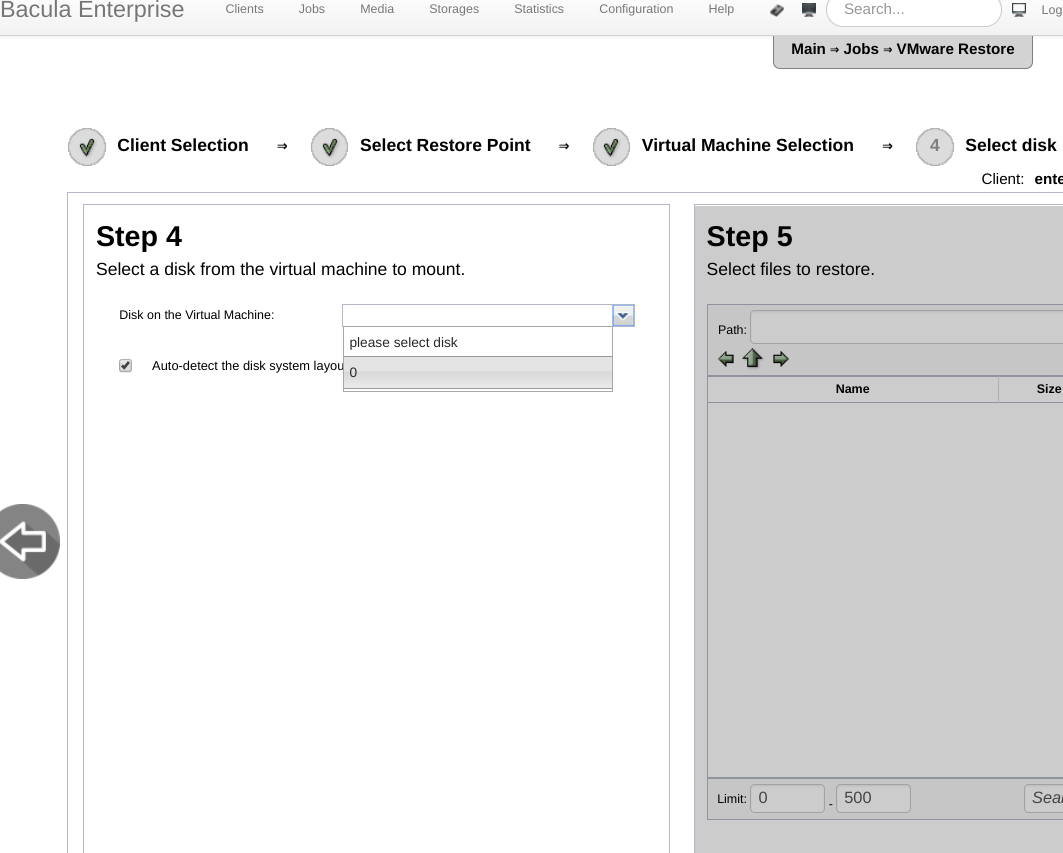
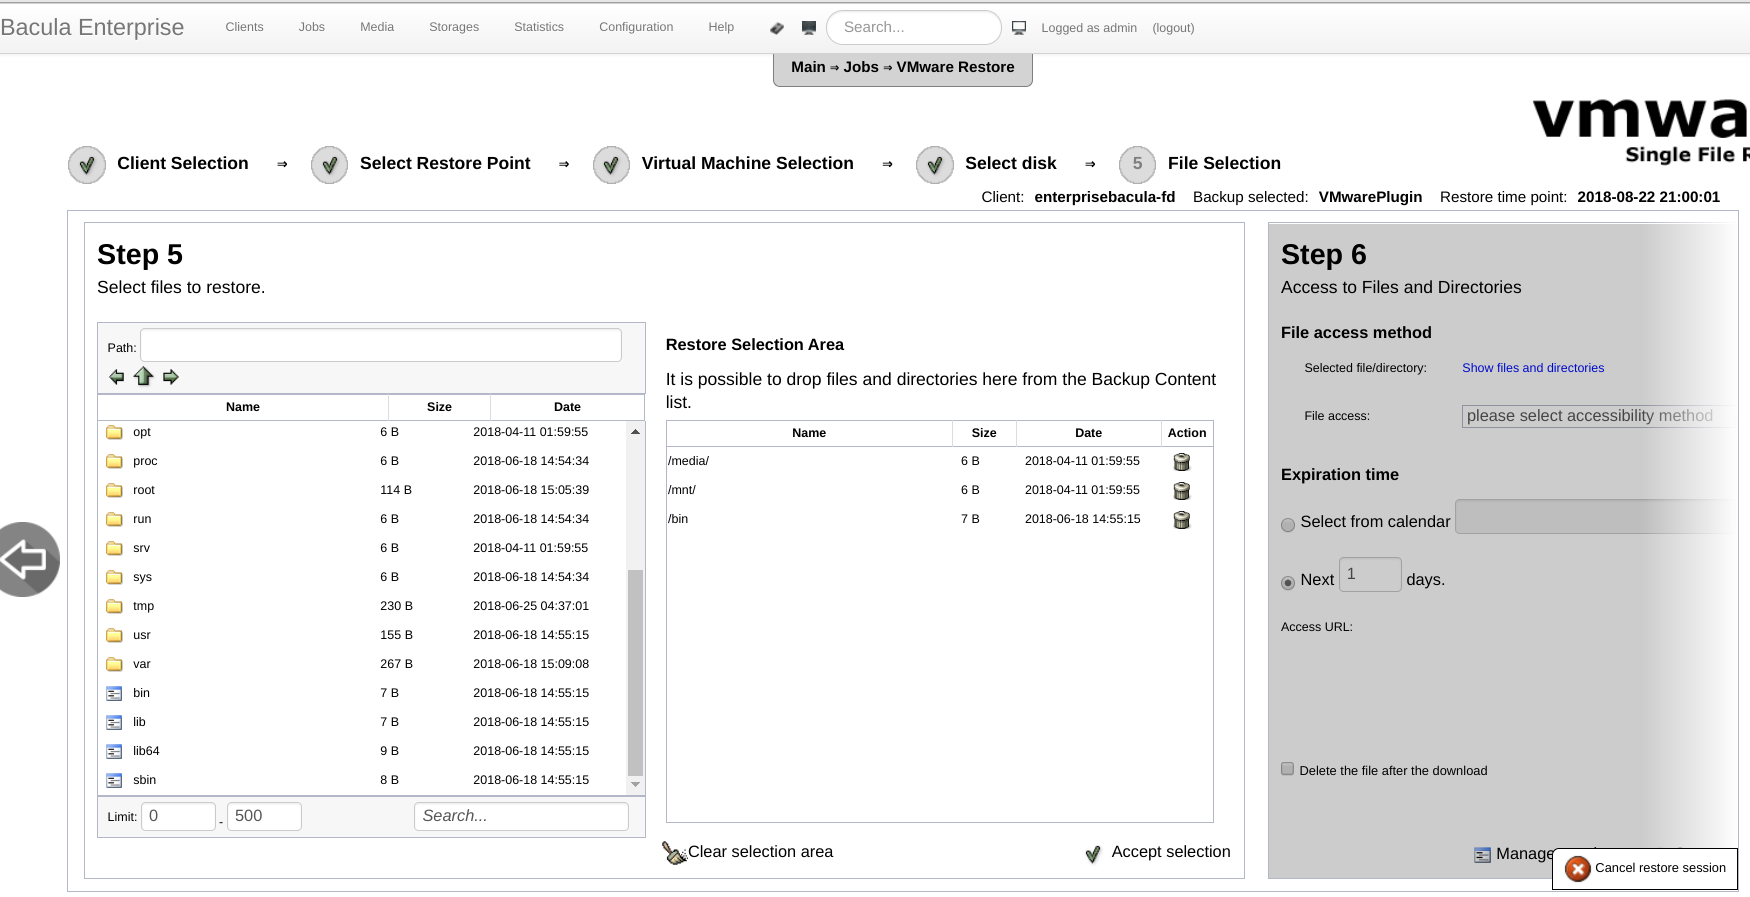
For VMware only, Figures 27 and 28 show additional steps for selecting the VM disk and which granular files will be restored. It is important to press the Cancel the Restore Session button (lower right corner) if you regret it, so that mount points are not left open on the Bacula server (Storage Daemon).
Figure 27. Single VMware Restore Submenus, Disk Selection for Granular Restore
Figure 28. Single VMware Restore Submenus, Files and Directories Selection for Restore
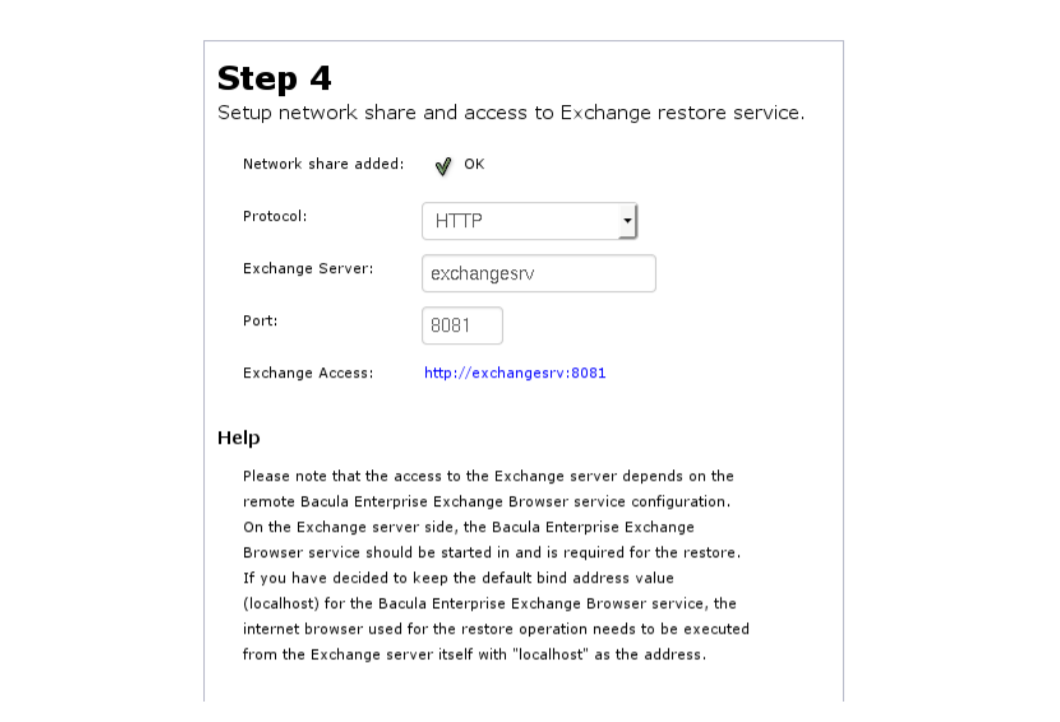
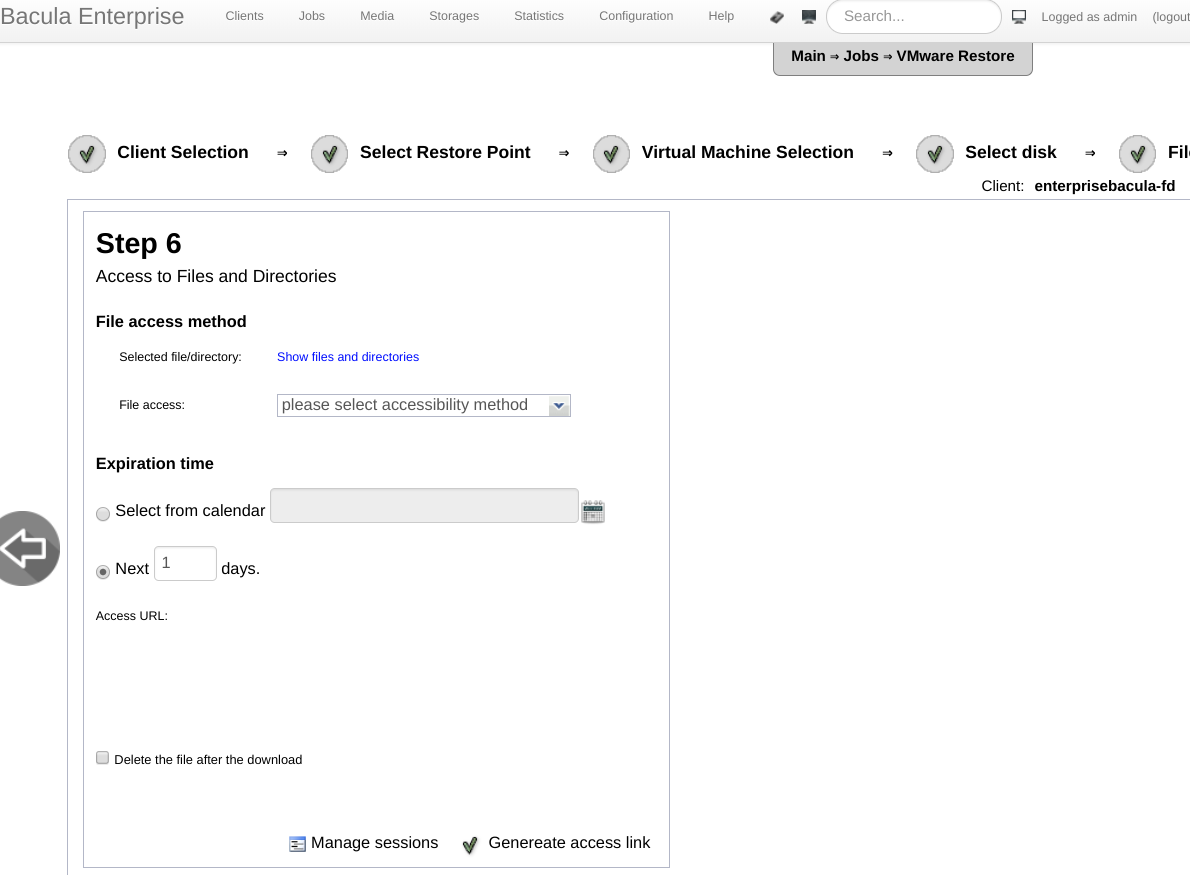
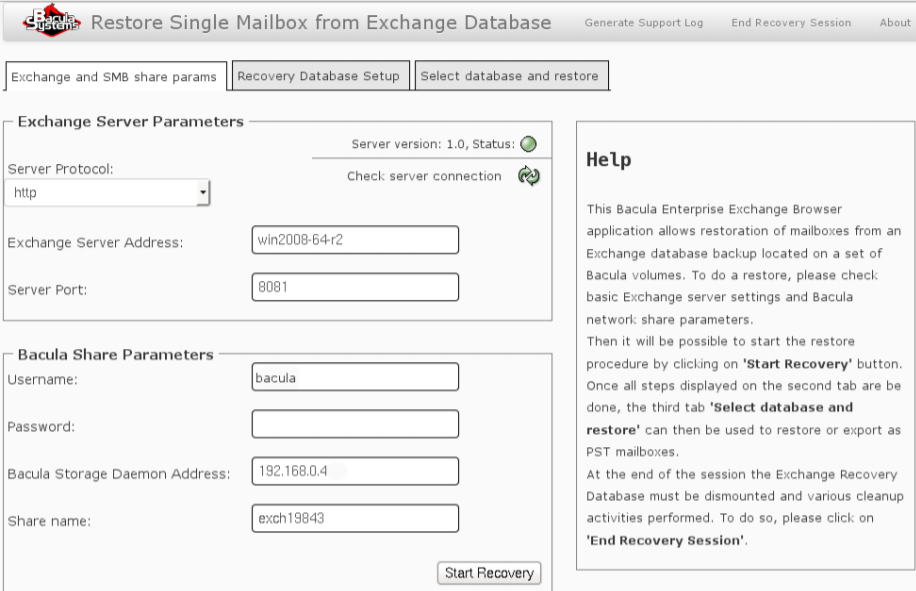
Finally, Figures 29 and 30 show the final screens for granular restoration of Exchange or VM Vsphere files. For Exchange, enter the addresses for connection, which will lead to a few more screens that will allow you to set up bases and restore mailboxes. For VMware (Figure 30), it is possible to download the selected files directly in the ZIP, tar.gz, raw format, or even to generate a link for the user requesting the restoration to access the generated data package.
Figure 29. Single-Item Exchange Restore Submenu, Connection to the Exchange Service
Figure 30. VMware Restore, Download Data Submenu
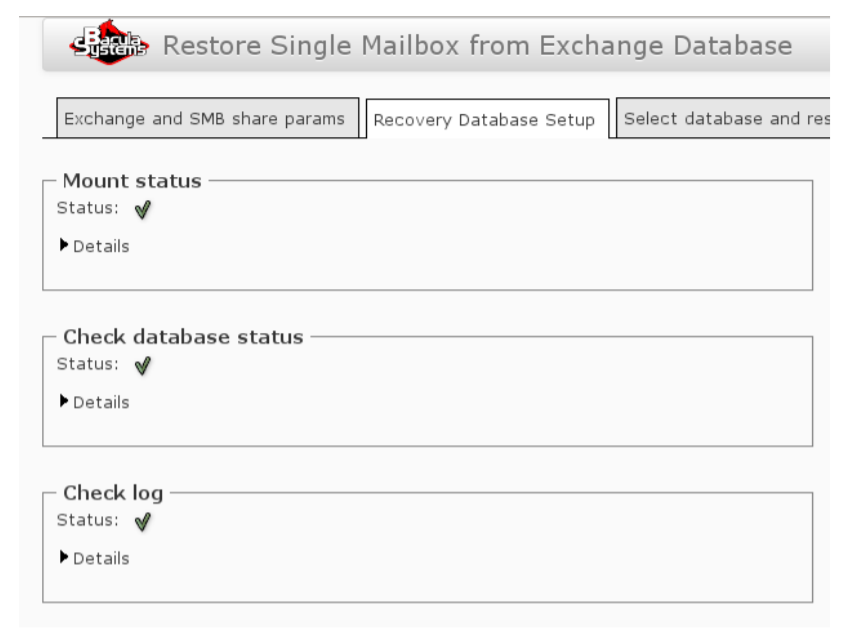
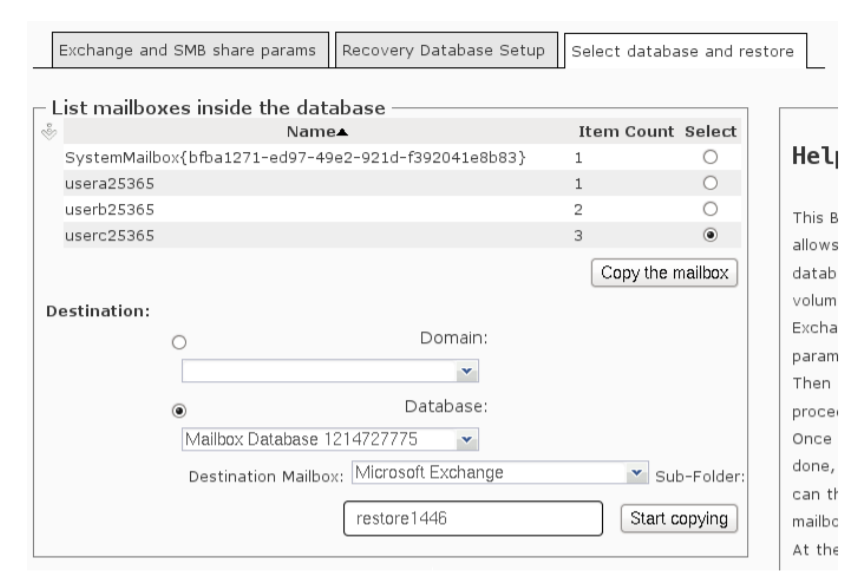
Finally, for Exchange only, Figures 31, 32 and 33 show the additional options for setting up a database and retrieving user mailboxes.
Figure 31. Exchange Banking and Mailbox Restore Interface
Figure 32. Exchange Service Connection Tests and Database Sharing
Figure 33. Selecting Exchange Mailboxes for Restore.
Administration Module Media Menu
Pools Submenu
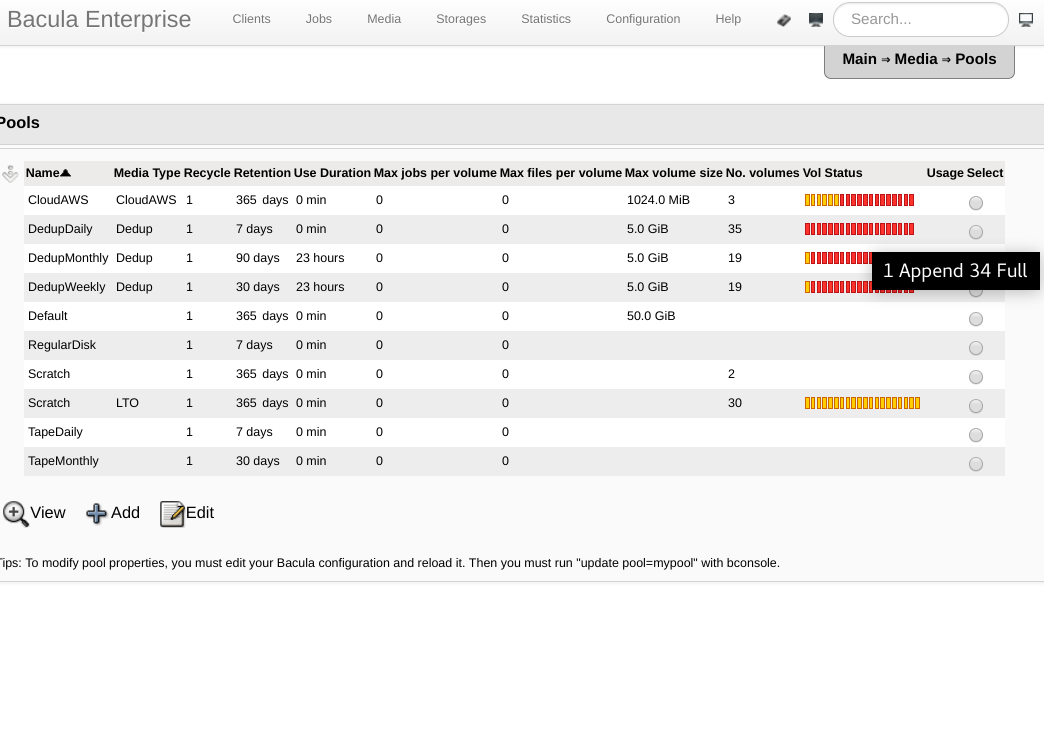
Depending on Figure 34, the Pools screen shows a summary of retentions, pool attributes and number of volumes. Hovering the mouse over the Volume Status graph bar, a total of the volumes by status is shown. If you select a Pool and click the View button, you can see a listing and details of the Pool’s volumes. By clicking the Add button, you will be taken to the screen for adding a new Pool in the Configuration Module.
Figure 34. Bweb Pools submenu
Submenu Location
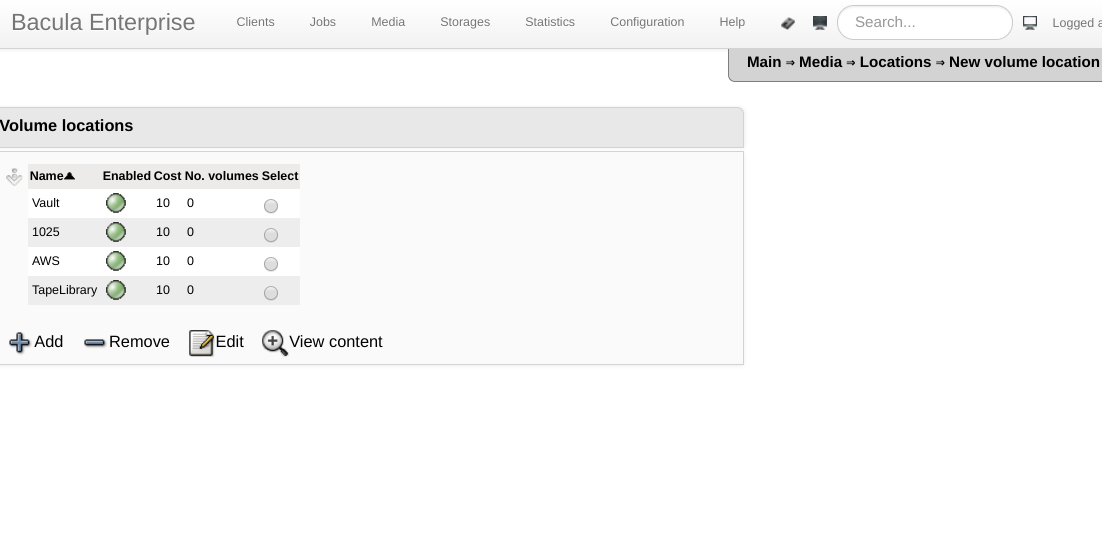
According to the Figure 35, the Location screen allows the administrator to create a new attribute for volumes, which would be the physical location where they are located. This makes it easier to control removable media, such as magnetic tapes stored in safes or other buildings other than where the backup is made. You can add or remove locations on this screen, or list the volumes for each Location.
Figure 35. Media menu, Location Submenu
All Media Submenu
Figure 36 shows the screen showing all Bacula volumes. You can use different filters, eject and load media to match the Location attribute of the media (we’re not talking about tape libraries yet), edit the attributes of a volume only, see usage statistics as well as read and write errors on the media, remove a volume, purge (recycle) a volume and update a Pool. The “Update Pool” button is particularly important for attributes that have been modified in the configuration of a Pool (eg, volume retention), or for a volume moved from one Pool to another, to have applied the new configured attributes. or the new Pool.
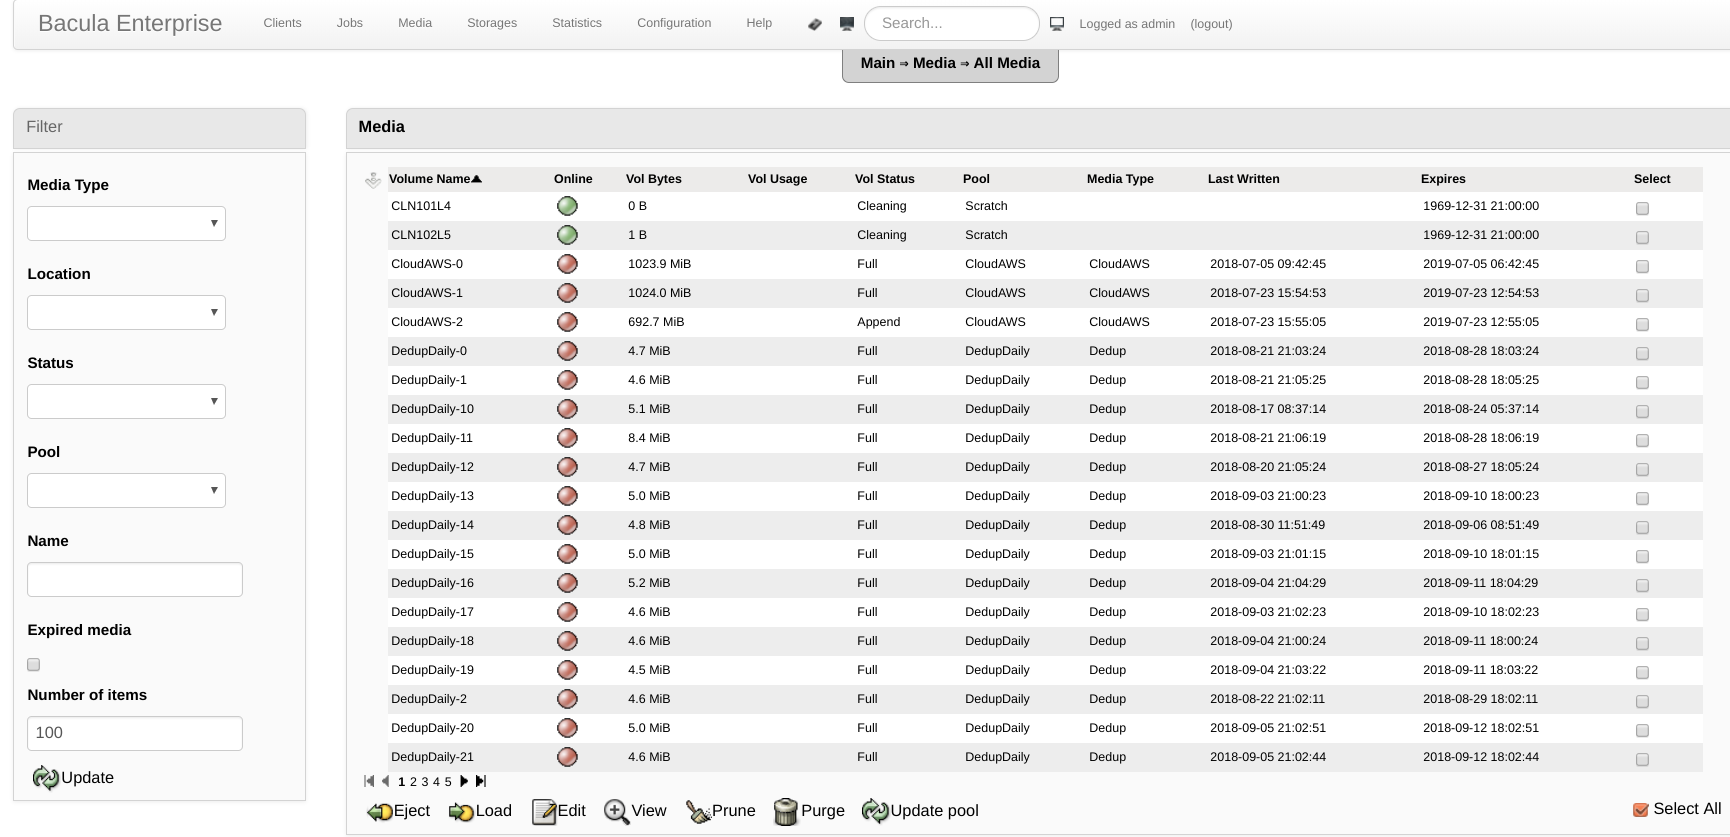 Figure 36. Media Menu, All Media Submenu
Add Media Submenu
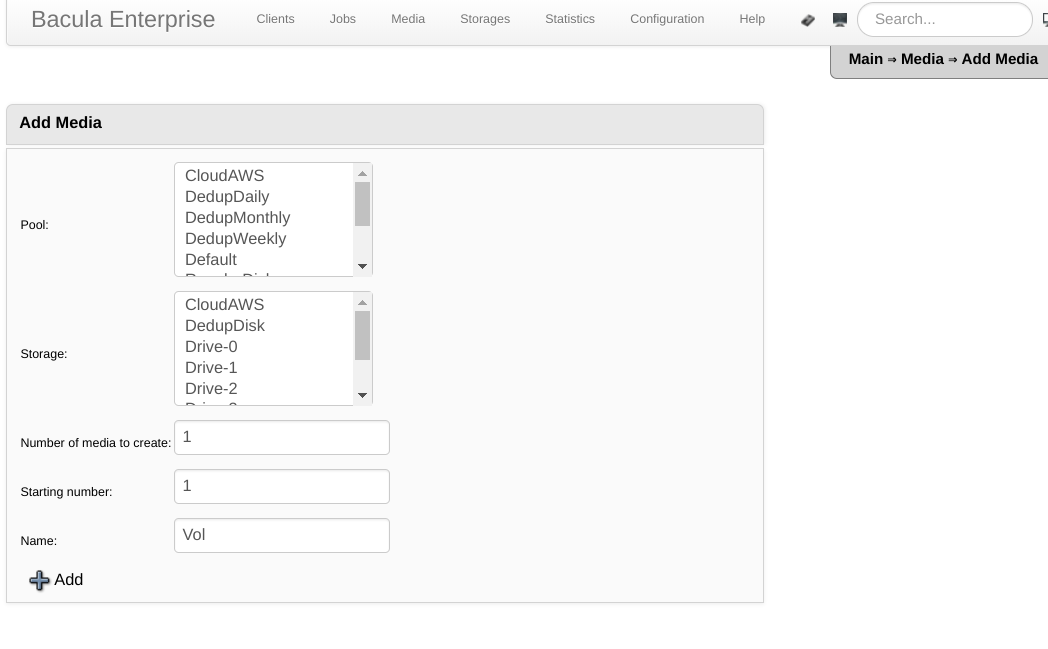
As shown in Figure 37, the Add Media screen allows you to create multiple volumes of Bacula (add command from bconsole). This operation is rarely used, as it should not be used for tape libraries (which have a volume name determined by the printed barcode), and for disk volumes can be created automatically by the Bacula (LabelFormat directive). However, the add command can be used for tapes in case of contingency if you have volumes created by Bacula on magnetic tapes and that for some reason do not have the respective information in your server’s Catalog (a flaw in the label barcodes command, for example ). Another hypothesis is if the administrator wants to pre-create a defined amount of disk volumes and not use the automatic label.
Figure 37. Media Menu, Add Media Submenu
Eject and Load Submenus
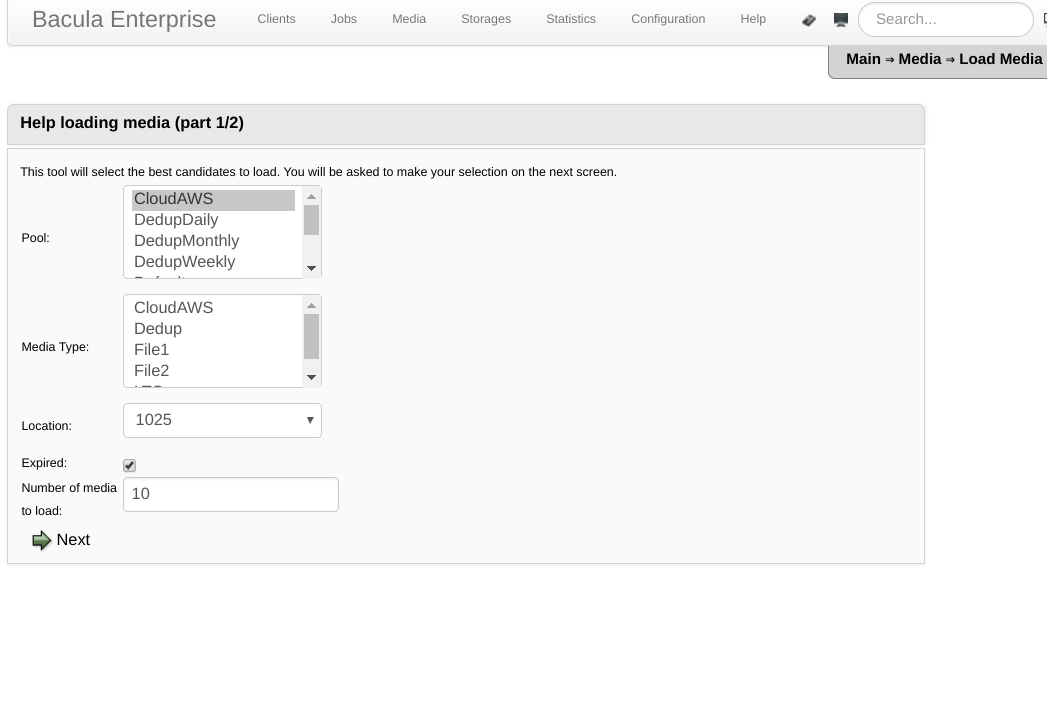
As shown in Figure 38, the Eject and Load Media screens allow you to manipulate the Location attribute, which, as explained, should be the physical location of the volume. If it is removable media, it is possible to send an email to the backup operator requesting the manual removal or insertion of the tapes in the manual drive or in the media library.
Figure 38. Media Menu, Eject and Load Media Submenus
Storages Menu
Manage Device Submenu
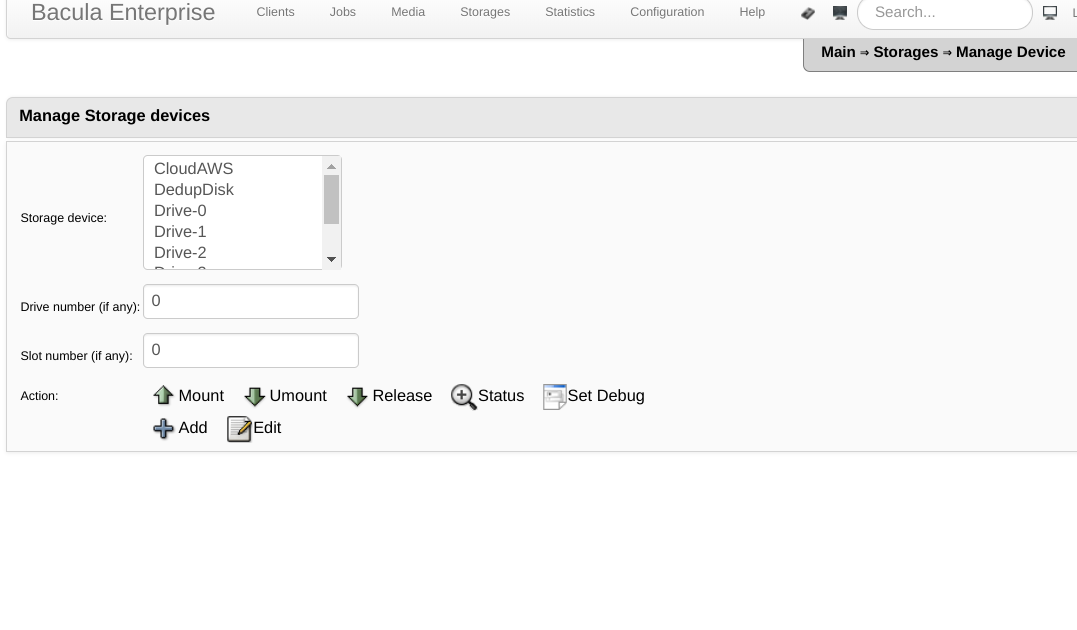
As shown in Figure 39, this screen allows you to load tapes into the drive of a library (Mount), unload a tape disabling the drive until the administrator does not load another one (Umount), just unload the tape keeping the drive free for Bacula (Release), check the status of a device, put the Storage Daemon in debug mode (Set Debug), add a Storage configuration (Add) or edit the configuration of an existing one (Edit).
To do these operations you need to know the niche (Slots) of the tape being moved. The next Submenu (TapeLibrary Name) when enabled, allows you to list tapes in the tape library and move them in a more intuitive way.
Figure 39. Storages Menu, Manage Device Submenu
[Your Tape Library Name] Submenu
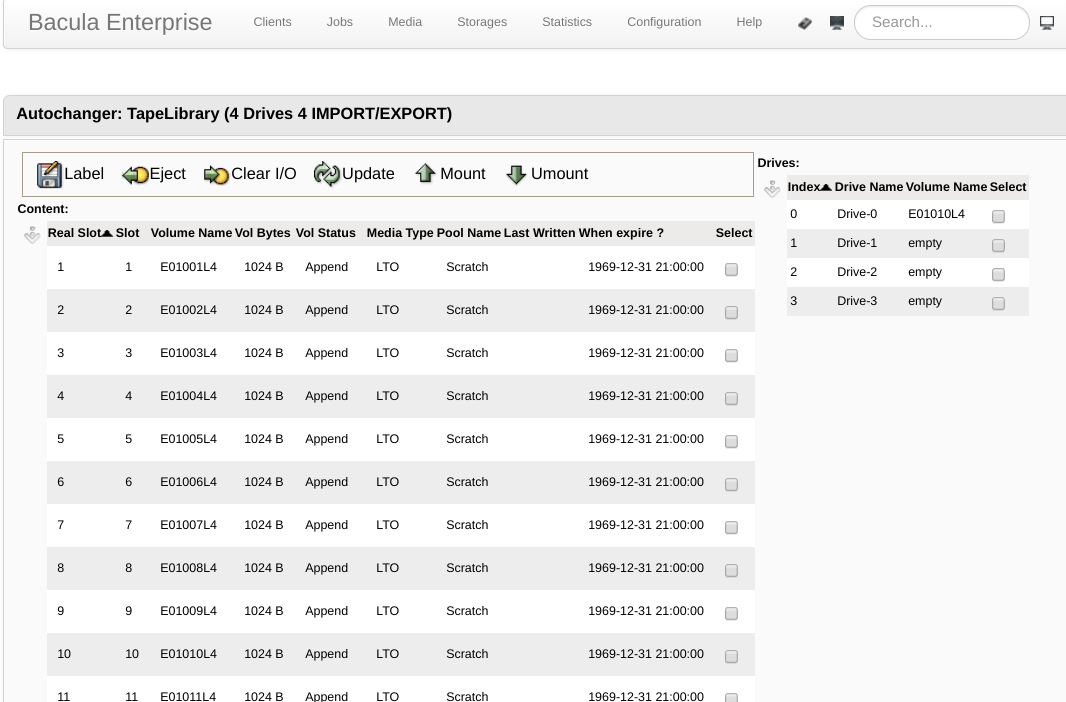
As shown in Figure 40, the Submenu that will be created with the configured name of your tape library requires additional Bweb configuration to be displayed (https://postgrespro.com.br/bweb-tape-libraries-graphical-operation-robots-enterprise-bacula/?lang=en). It allows you to label the magnetic tapes in the library (Label), eject a tape from the drive (Eject), clean the Input and Output niches (Clear I / O), update the tapes that Bacula thinks are in the robot (Update ), loading and unloading tapes (Mount and Umount). To load a tape, select it, the Drive you want to use and click the Mount button.
Figure 40. Storages Menu, [Your Tape Library Name] Submenu
Statistics Menu
Statistics Submenu
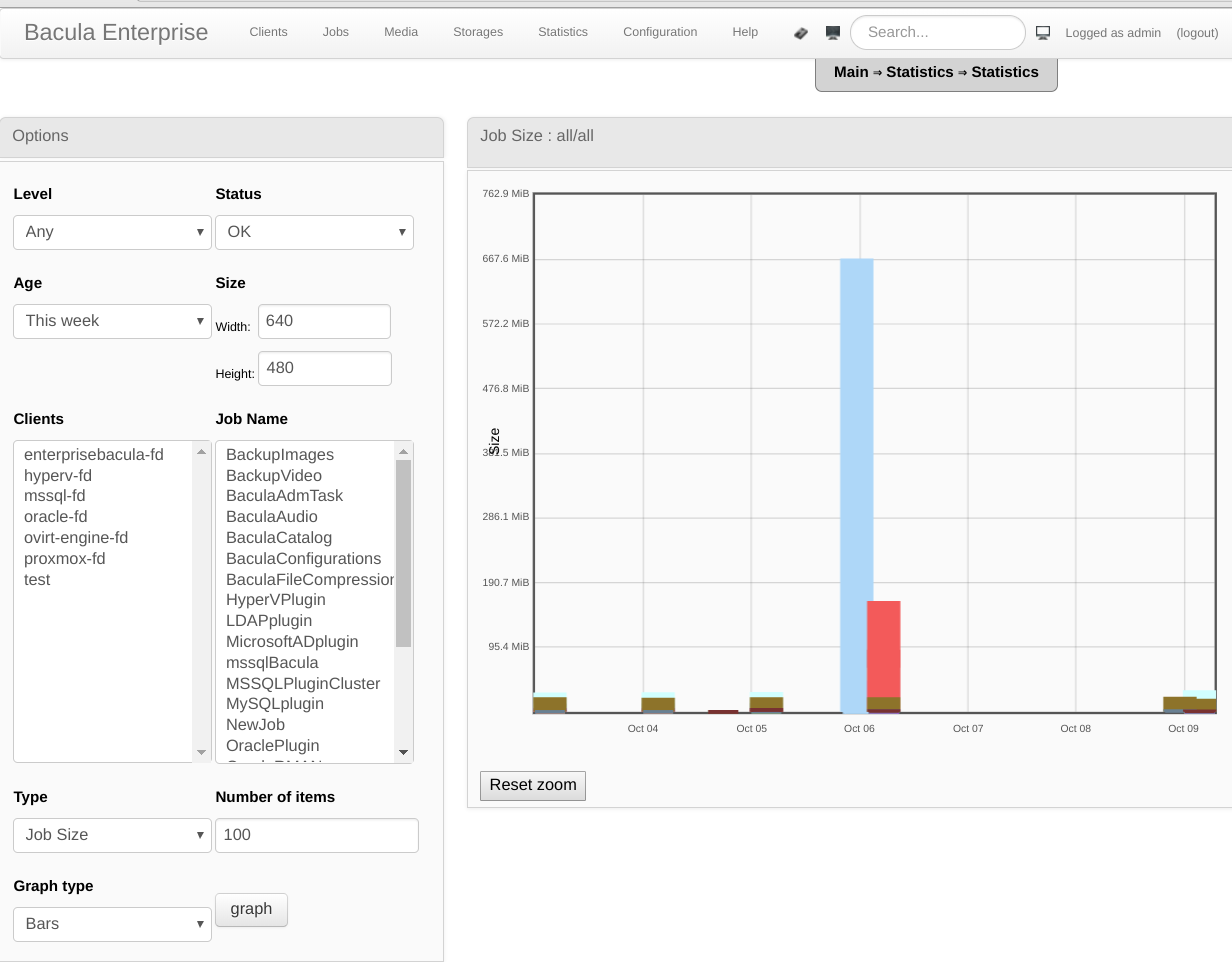
As shown in Figure 41, this screen allows you to generate graphical information about practically all Bacula objects: Jobs size, duration, transfer rate, number of Jobs files, Jobs per hour, Jobs per day, average bytes per Job per hour or day, size of Jobs per hour or day, count of Jobs (hour or day), average size of Jobs, average files over time, etc. It is also possible to use filters, change the resolution of the generated graphics and use different types: bars, lines, balloons, among others.
Figure 41. Statistics Submenu for Charts Generation
Backup Timing Submenu
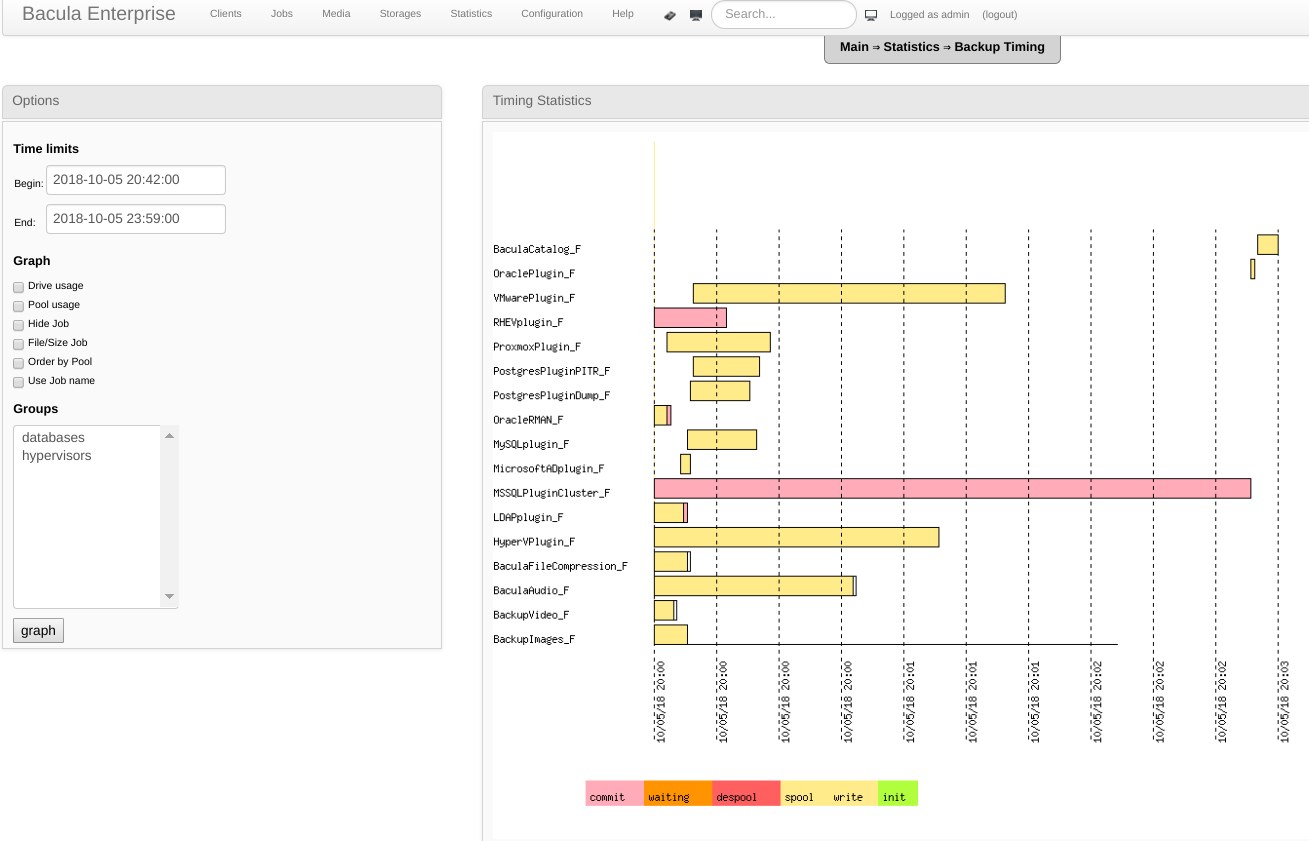
According to Figure 42, this screen shows a Gantt chart of the performed backups. It is possible to modify the graph’s time lapse, sort by pool, and monitor different objects such as Drives and Pools used, check the size and quantity of Jobs’ files, categorize the graph by Customer Groups, among others.
Figure 42. Backup Synchronization, Gantt Chart Generation Submenu
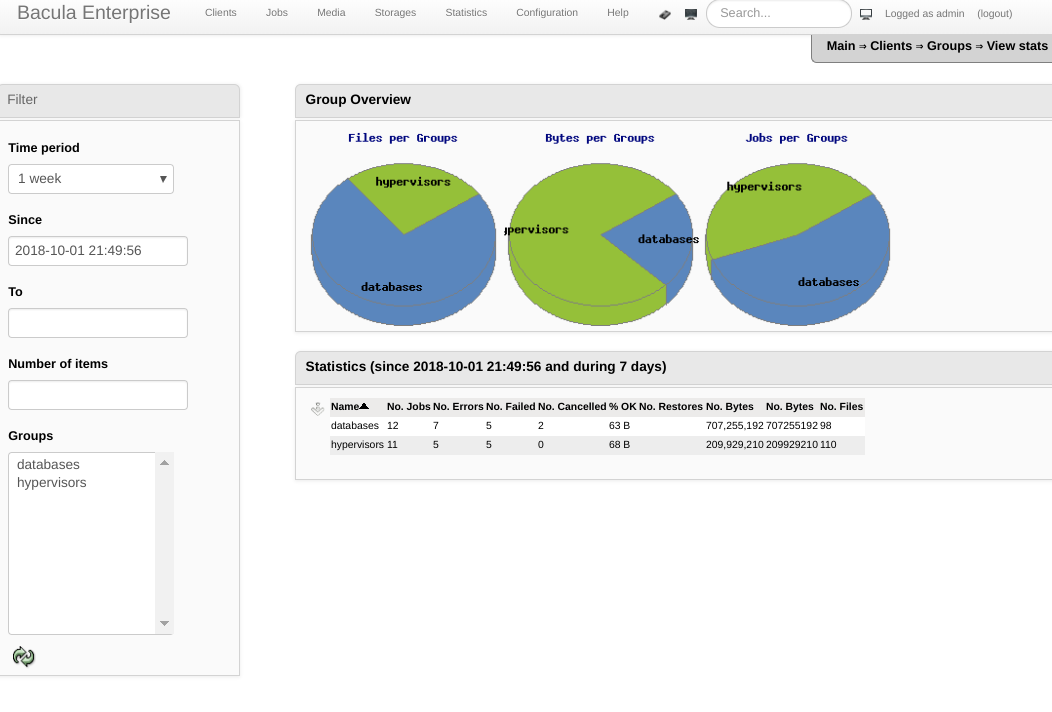
Groups Statistical Submenu
As shown in Figure 42, this screen shows the data summary and comparison between the Customer Groups created in Bweb.
Figure 42. Statistics Menu, Group Statistics Submenu
Dedup Usage Submenu
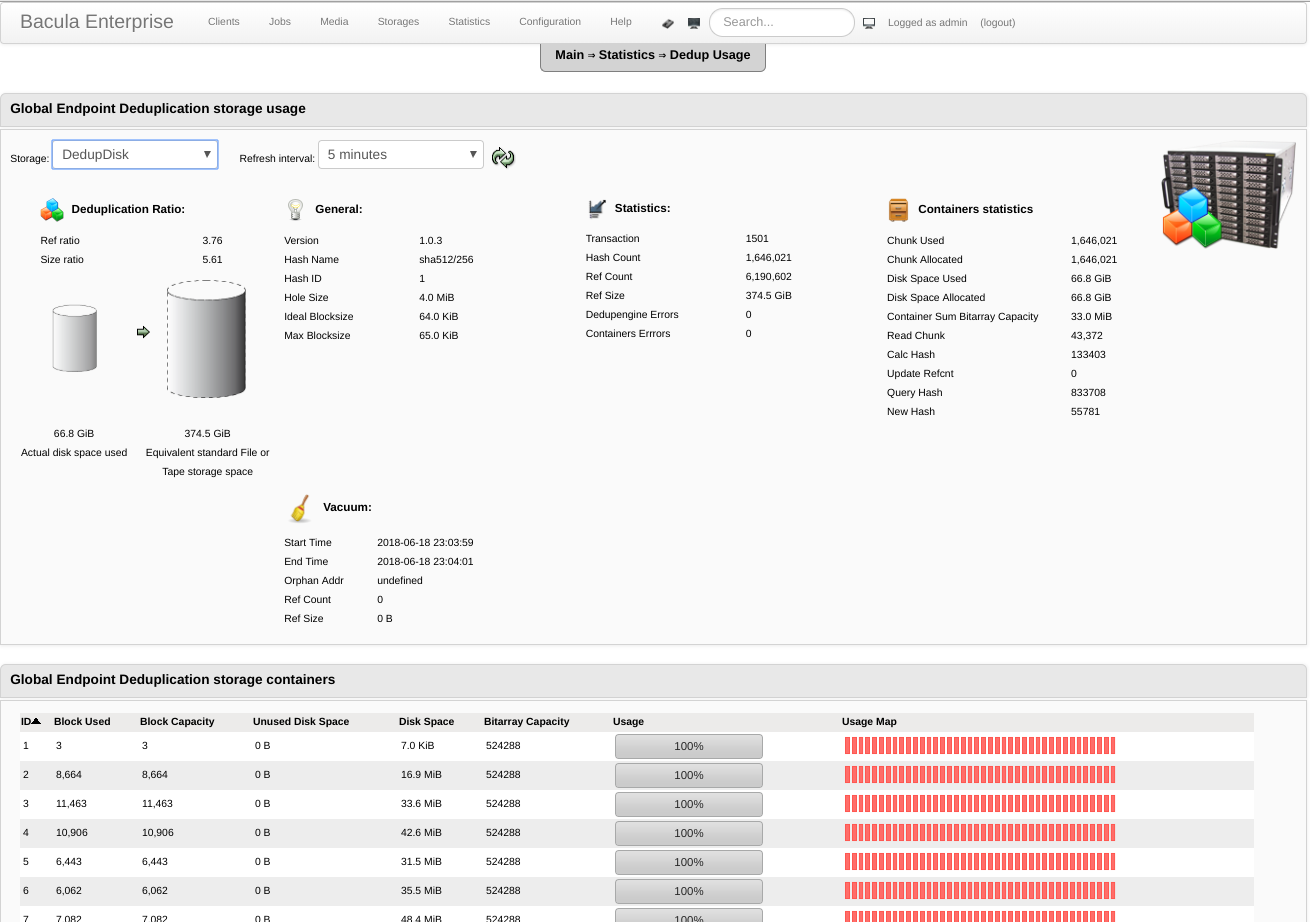
As shown in Figure 43, this screen allows you to see details of Bacula devices that use block-level deduplication. The Ref Ratio is the difference between the block count and the block hashes count. The Size Ratio is the ratio of the reduction in the size of the original data in relation to its dehydrated size occupied on the disk, and this corresponds to the graph that shows the occupation of the backups on disk (66.8 GiB against 374.5 GiB).
Also shown are the version of the deduplication engine, version of the hash, size of the Holes (Hole) when configured (allows Bacula to recycle pieces of the dehydrated backup cantainers on the disk, freeing up more space), ideal size of the block for better deduplication and the maximum configured block size to be deduplicated. Statistics of important deduplication transactions such as error count and containers are also shown, as well as statistics for containers. Finally, information about the vacuum operations is shown, that it is a periodic operation that must be scheduled to verify the integrity of the deduplication engine and that sometimes also frees up some space from blocks that are already useless.
In the bottom widget, a list of the backup containers is shown. They are created automatically and have different sizes, to allocate data from blocks of different sizes in an optimized size. However, it is possible to limit the growth of the containers so that they are not too large and a physical failure does not compromise an exaggerated amount of data.
Figure 42. Statistics menu, Deduplication Statistics Submenu
Configuration Menu
Configure BWeb Submenu
This submenu returns to the Bweb Configuration, which is the same as that shown at the first access to the tool and detailed at the beginning of this chapter.
Configure Bacula
This Submenu will take you to the BWeb Configuration Module for Bacula, as mentioned at the beginning of this Topic, and which will be detailed below.
Manage Users Submenu
This Submenu only appears when you enable any of the BWeb authentication methods, in my Configure Bweb (Security – lighttpd users, or System – Linux users on Bacula’s server and / or integrated with AD or LDAP – http: // www. bacula.com.br/configuracao-bweb-autenticacao-pelo-sistema-linux-active-directory-ad-centos-rhel-7/). The default Bweb user is admin, which needs to be created. More details about authentication can also be seen in the Bweb Whitepaper.
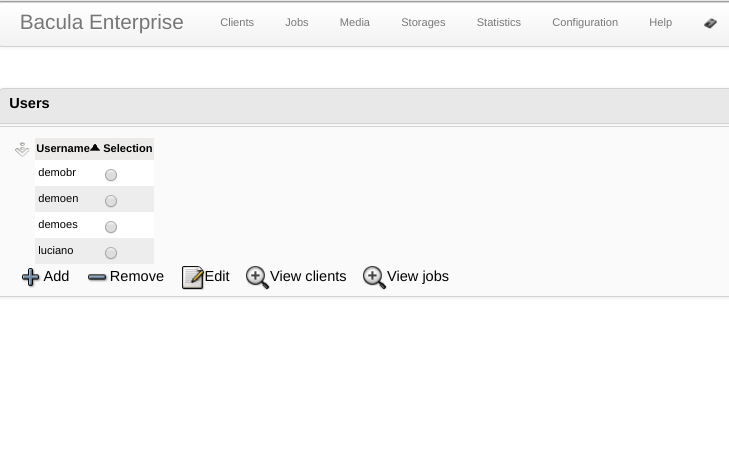
As shown in Figure 43, the first screen allows you to create, delete or modify users.
Figure 43. Configuration Menu – Manage Users Submenu
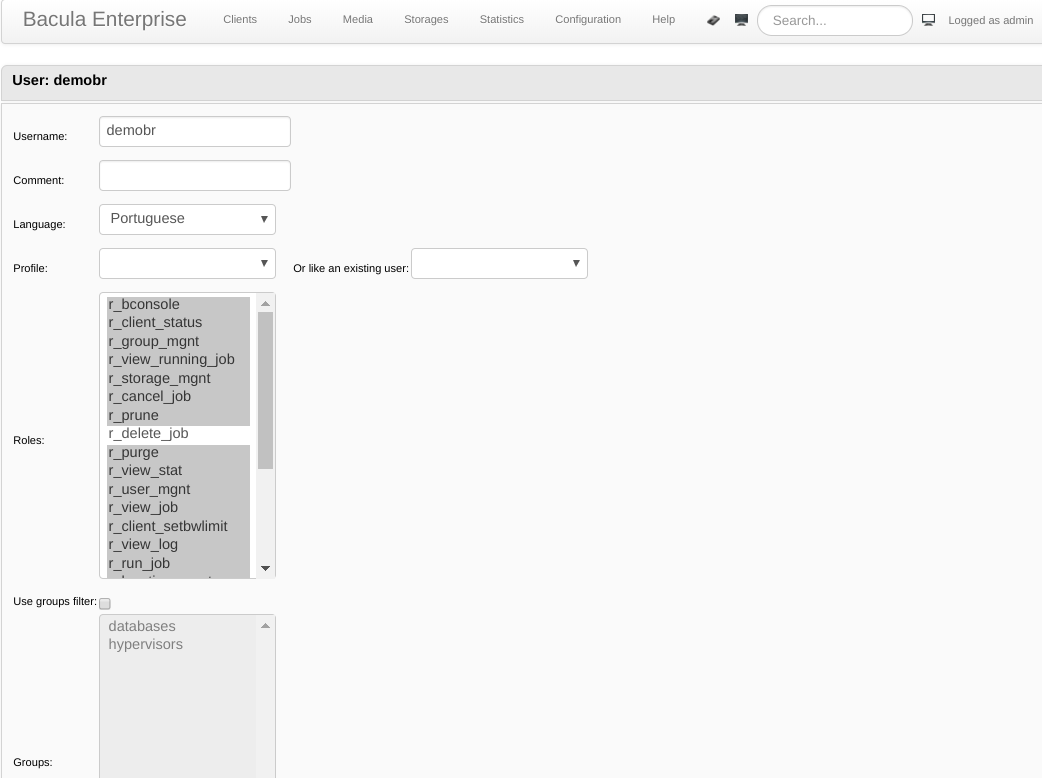
According to Figure 44, editing a user allows you to insert a comment about it, change its default language, choose a permissions profile or define them in a customized way for each user. It is also possible to give rights by Groups of Clients.
Figure 44. Editing Bweb User Permissions, Profiles and Preferences
Bacula Configuration Module
Figure 45 shows the EBacula Configuration Module buttons and menus. This module allows you to change the configuration files of all Bacula daemons, including remote File Daemons (clients) and Storage Daemons (installed on other machines), using the buttons in the middle of the screen. There are also buttons for the Security Center, which makes it easy to create and distribute certificates, and to configure encryption between Bacula daemons. VMware Center configures Bweb to access VSphere objects (ESXi, virtual machines, etc.) graphically through Bweb; Wizards that facilitate the configuration of new File and Storage daemons (buttons on the left side).
Note that by clicking on the central configuration buttons of each Daemon, the top menu is changed, corresponding to the configuration resources of the chosen Daemon.
Figure 45. EBacula BWeb Configuration Module
Workset Menu
Depending on Figure 46, the Workset Menu brings the user back to the Configuration Module’s initial screen when clicked. When changes are made to the settings, they need to be applied on this screen (Commit button) with the subsequent choice of the Director’s reload (does not abort running Jobs) or restart of the daemons.
Figure 46. Workset Menu, Commit Configuration Changes
Clients, Jobs, FileSets, Schedules, Pools, Consoles, Storages/Autochangers and Messages Menus
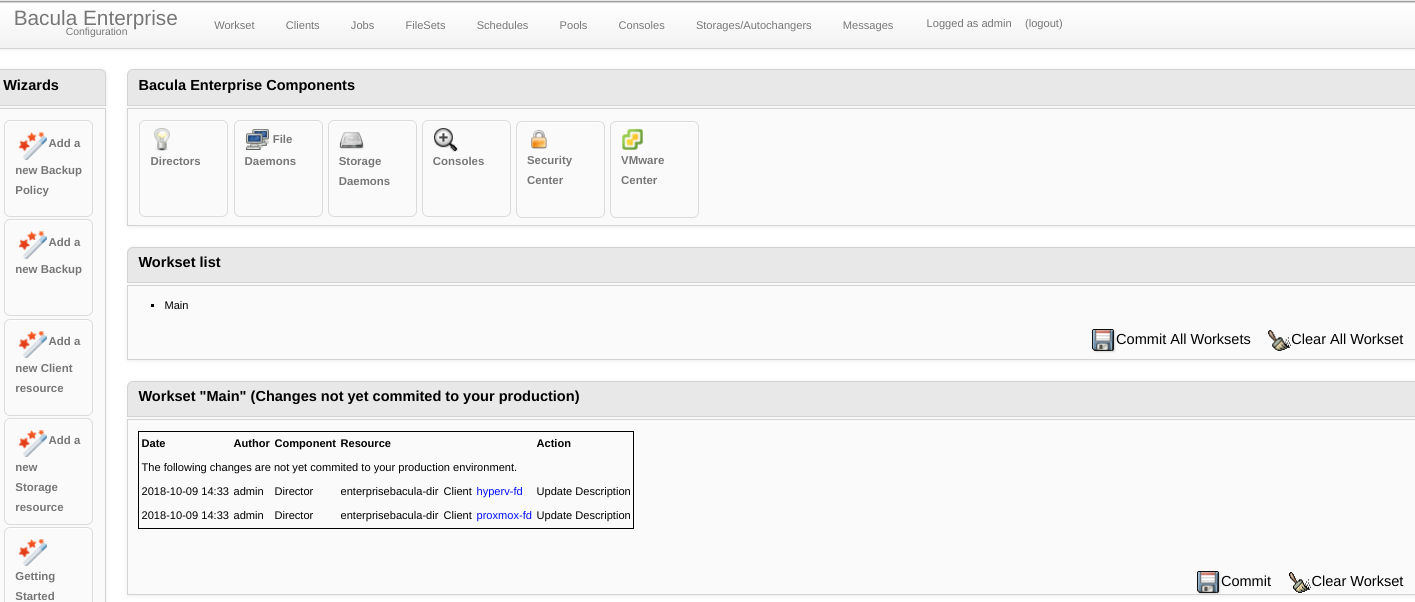
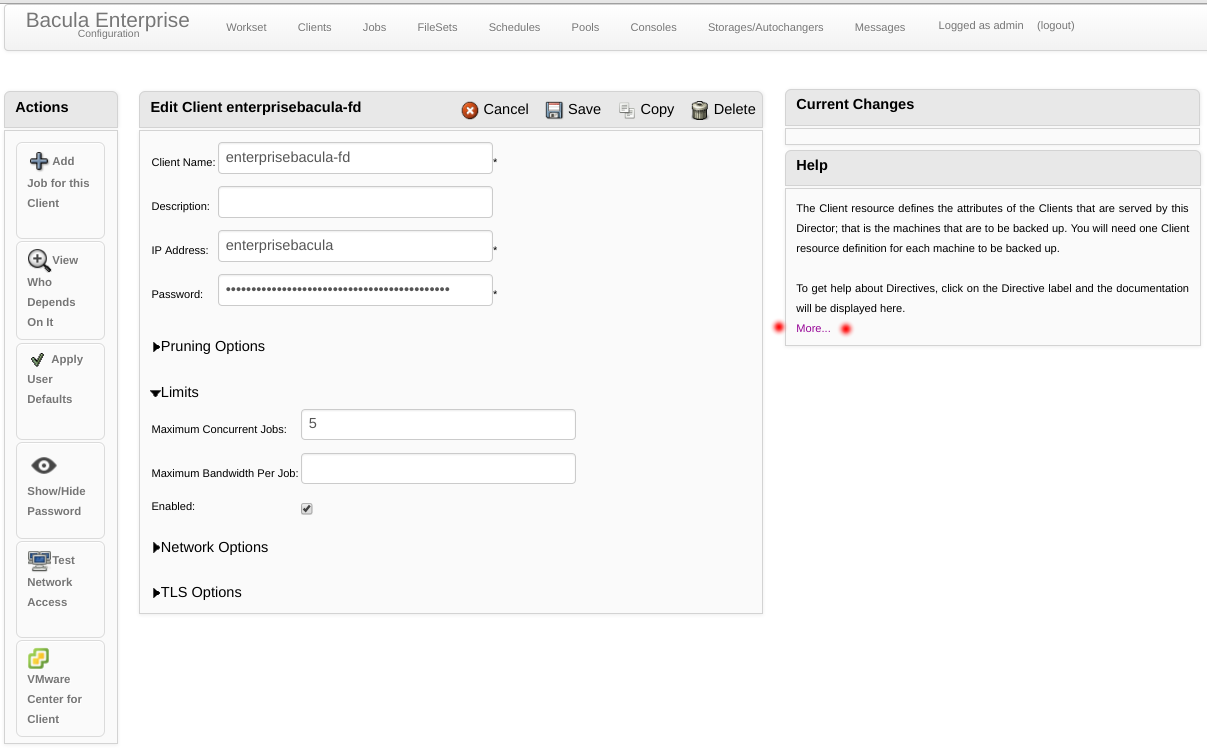
These Menus allow the alteration of all the directives that could be altered in the text files of the Bacula configuration. Figure 47 shows the example of the Client Menu, clicking on More in the help, the EBacula manual is opened describing all possible directives and values. The most important settings for Bacula were also discussed in the previous chapter and in the specific topics regarding the desired arrangements.
Figure 47. Bacula Configuration Module, Client Menu, Help Access
Practical configuration operations with Bweb such as adding backup clients and new arrays are discussed in a practical way in the topics of each routine.
New Clients Addition and Backup
New Client Configuration
After installing the Bacula Client on the machine you want to extract backups, it is necessary to tie it to the Director. To do this, we must edit the Linux Client or /opt/bacula/etc/bacula-fd.conf file or C:/Program Files/Bacula/bacula-fd.conf (Windows) so that the name of the Director is authorized to access this Client. In the case of Windows, you could have already informed the Director’s name during the Client installation wizard.
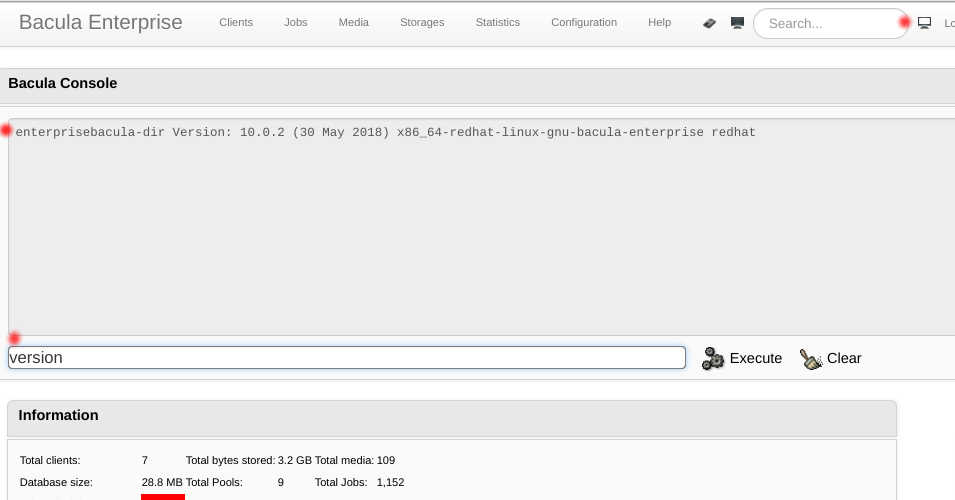
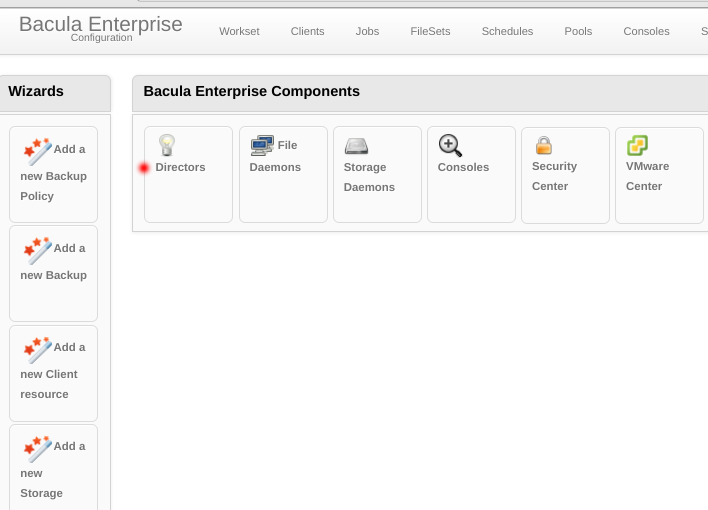
As in Figures 48 and 49, you can obtain the Director’s name in two ways. Whether through the Web CLI (version command, you need to enable it in the Bweb configuration) or by accessing the Configuration Module> Directors button in the center of the screen. In my case the Director’s name is enterprisebacula-dir.
Figure 48. Command version to query for the director name
Figure 49. Finding the Director Name in its Configuration, in order to Configure a new Client
Your Client configuration file (bacula-fd.conf) should look like this (ignore the other Director -mon resource that has the Monitor = yes directive).
Director {
  Name = "enterprisebacula-dir"
  Password = "M3bgzWMFJFVblvBanYIrnAHCFj3gP4tOGSy0QfzwQ/Zi"
}
Take this time to copy the value of the password (Password) to a notepad, as we will need it later to tie this Client to the Director. Restart the bacula-fd service to apply the changes.
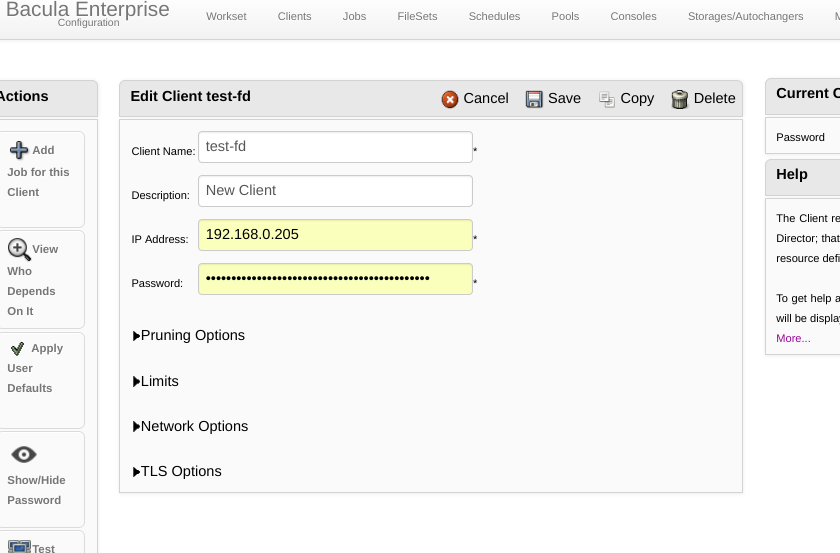
Returning the Bweb, in line with Figure 50, go to the Configuration Module, Customers Menu and click on the plus button to fill in the information for the new Customer. Use the IP address or qualified name of the Client machine and the password you copied in the previous step.
Figure 50. New Client Configuration
Save the changes. You can then go to the Workset menu, commit the changes, return to the Administration Module, Client Menu and Submenu and perform a status command in order to verify that the new settings and communication with the Client port 9102 work correctly, or you can simply create a new FileSet and Backup Job for this new Client (which will most likely be what you want). The procedures for creating FileSet and Backup Job are described below.
New FileSet
After tying the new installed Client to the Director of Bacula, the administrator will most likely want to create a FileSet and a Backup Job in order to copy data from the Client. Unless, of course, you already have a FileSet created that makes the backups of the same content you want to do with the new Client, in which case it can be reused and you just need to create a new Job.
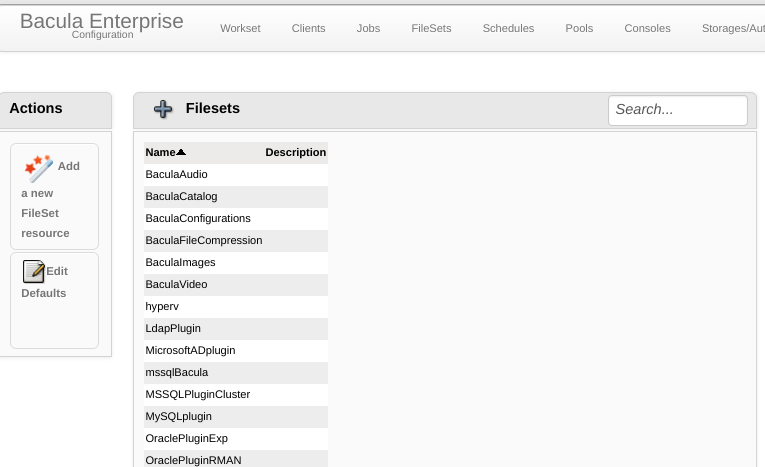
As shown in Figure 51, in the FileSets Menu of the Configuration Module, click on the “more” icon to create a new FileSet.
Figura 51. Clica no Sinal de “Mais” para Criar Novo FileSet.
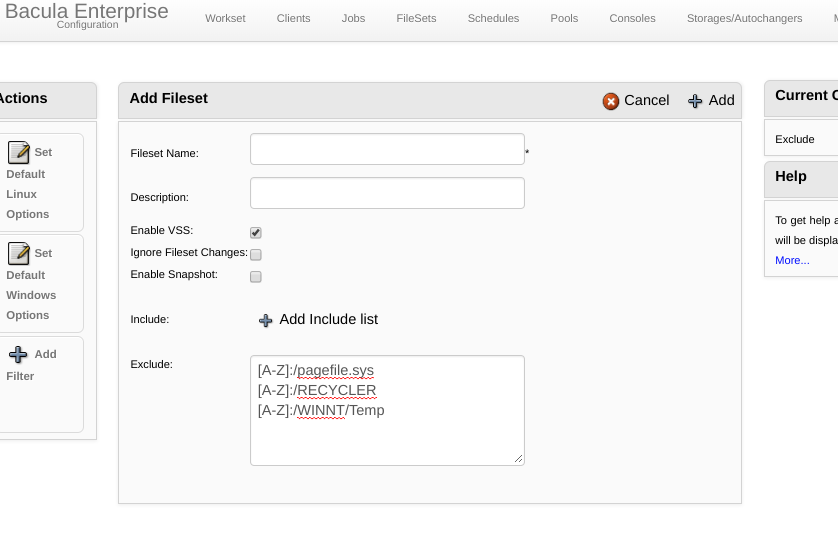
According to Figure 52, editing the FileSet allows you to name it, enable or disallow VSS (shadow copy/open Windows files, if applicable), ignore changes to the FileSet that make Bacula perform a new Full backup later, enable file system snapshot after the backup, link to the Include options for inclusion in the FileSet and the Exclude field. If you click on the Linux or Windows “Set Default Options” wizards, Exclude receives some typical folders for these systems that do not need or should not be backed up.
Figure 52. Editing EBacula’s FileSet in Bweb
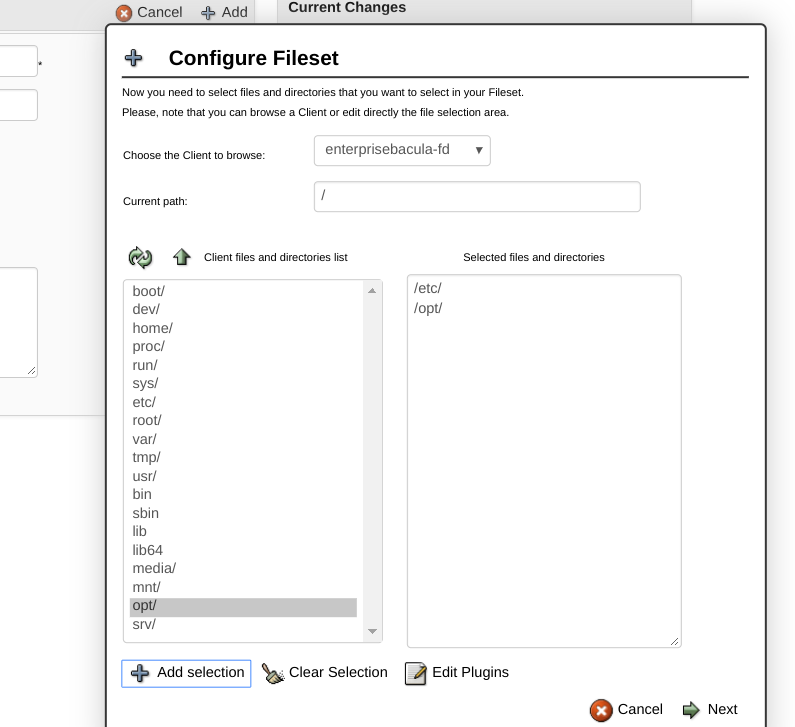
Shown in Figure 53, the link to Include FileSet content opens a popup for connecting to Clients, browsing and choosing files and folders for backup. In the example, I chose interesting content to back up Bacula’s own server settings.
If so, click Edit Plugins to include specialized backup of specific applications, as shown below.
Figure 53. FileSet configuration Include – First Screen
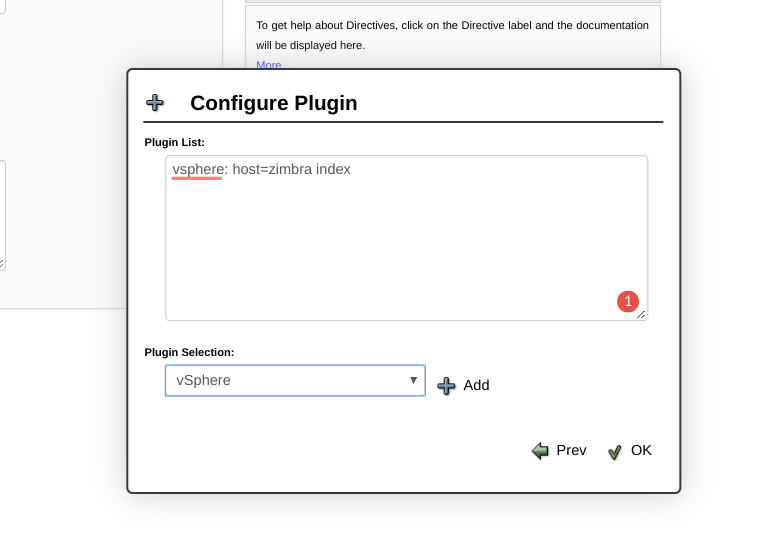
As shown in Figure 54, the edit plugins window defines how they will be activated (after they are installed). By clicking on the “Plugin Selection” combo box, a list will appear with most of Bacula’s plugins, and by clicking on any of them a wizard will appear to help with their configuration. In the example, I am backing up a VSphere VM with the name zimbra and with the index option to speed up granular file-level restoration.
Figure 54. Plugin Configuration window, FileSet Menu
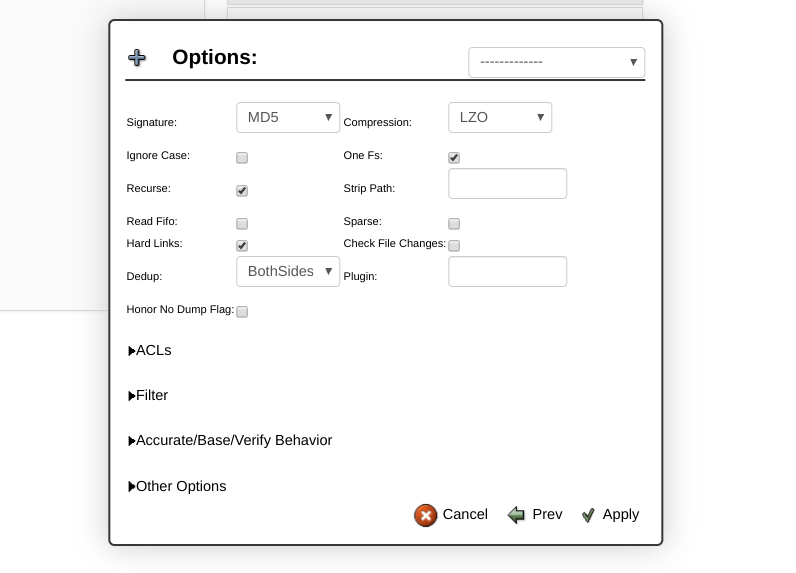
According to Figure 55, after clicking OK and Next in the FileSet Include window, you will be taken to the final FileSet configuration options. In the example, I changed the signature options (which hash check the integrity of the backed up files), the compression format (LZO is the one with the least impact on the backup speed), and the Deduplication option at the Global block level (BothSides). Dedup does not actually compress data on the Client, only on Storage after the backup is deduplicated for greater compression efficiency, so the LZO setting is only for Bacula to show the Compression Rate (Software Compression) in its log, which will be the total reduction in the size of the backup given by the deduplication plus the compression made by the dedup engine itself.
Other options are: ignore FileSet’s capitular sensitivity (by default it is sensitive, even for Windows), back up only one file system (One FS) or enter the mount points (eg backup of Linux root “/” would also include /boot on another partition automatically), do recursive backup (default), strip the /home directory from the path to backup (e.g. to delete the /home expression from a user’s folder – /home/user), enable the reading of FIFOs (Named Pipes) in the file system, backup of sparse files, backup of hard links, again check changes in the file system for new automatic Full backup, and other more situational options.
ACLs session, enable backup of special XATTR permission systems. Filters, wildcards and regular expressions to include or exclude files and directories in the FileSet. Accurate/Base/Verify contains options for these functions (accurate is a more accurate backup of Bacula that takes into account files deleted from the system or not), base is the deduplication at the file level (surpassed by the level block) and verify is the integrity check of Bacula components, including volumes in Storage.
Click Apply to apply, then click Add on the FileSet home screen to include the new configuration
Figure 55. Final FileSet configuration options via Bweb
After creating the FileSet, you will most likely want to create a Backup Job configuration in order to make the first copy of your Client’s data, as shown below.
New Job
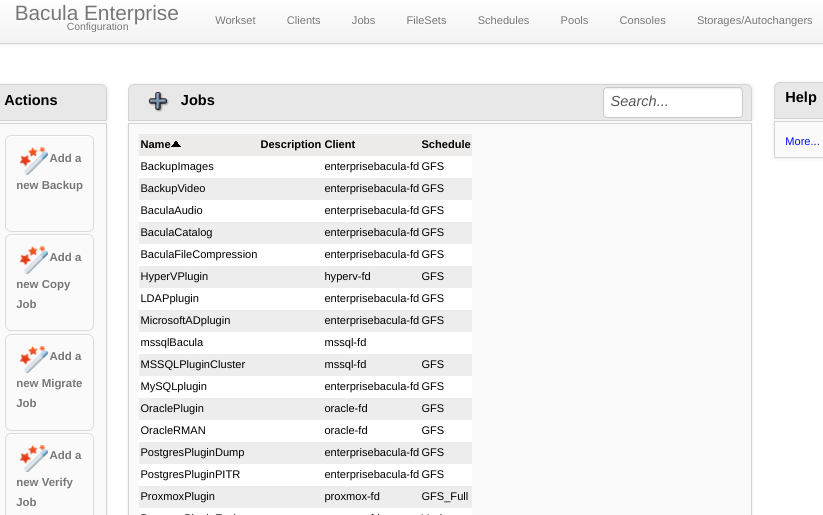
As shown in Figure 56, still in the Configuration Module, go to the Jobs Menu and click on the plus sign to create a new backup Job.
Figure 56. Add a Backup Job
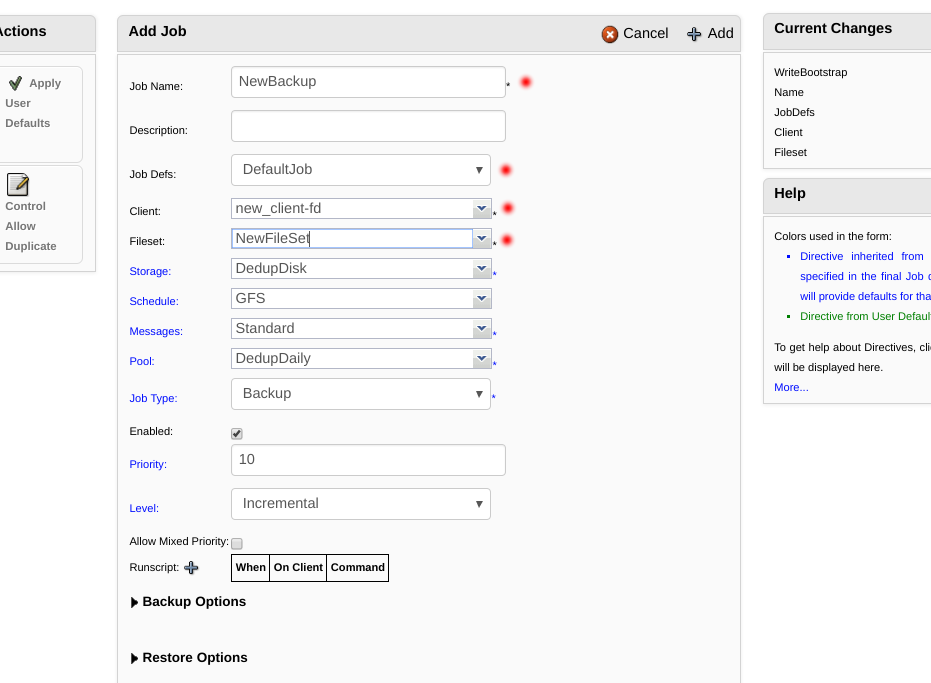
As shown in Figure 57, you will define a free name for this Job and it is recommended to choose a JobDefs so that the default options are filled out (inherited values in blue color). You must choose the newly created Client and the desired FileSet for this backup. You may want to choose a different Schedule if applicable. Depending on your strategy you may want to modify the Storage, Pool and Level of this backup Job, remembering that these directives are only the default for individual Jobs (since in the Schedule you can customize these values throughout the scheduled periodic routines).
It is also possible to enable/disable this backup job (Enabled), modify the priority, configure the execution of Shell scripts and the bconsole pre and post backup job, rescheduling jobs with error, Scan job options and migration (if it was this type), limits such as MaximumConcurrentJobs and MaximumBandwidth, duplicate Jobs control options of the same type, among others. Finally everything that could be configured in Bacula’s text files.
Click Add to accept the new configuration.
Figure 57. New Backup Job
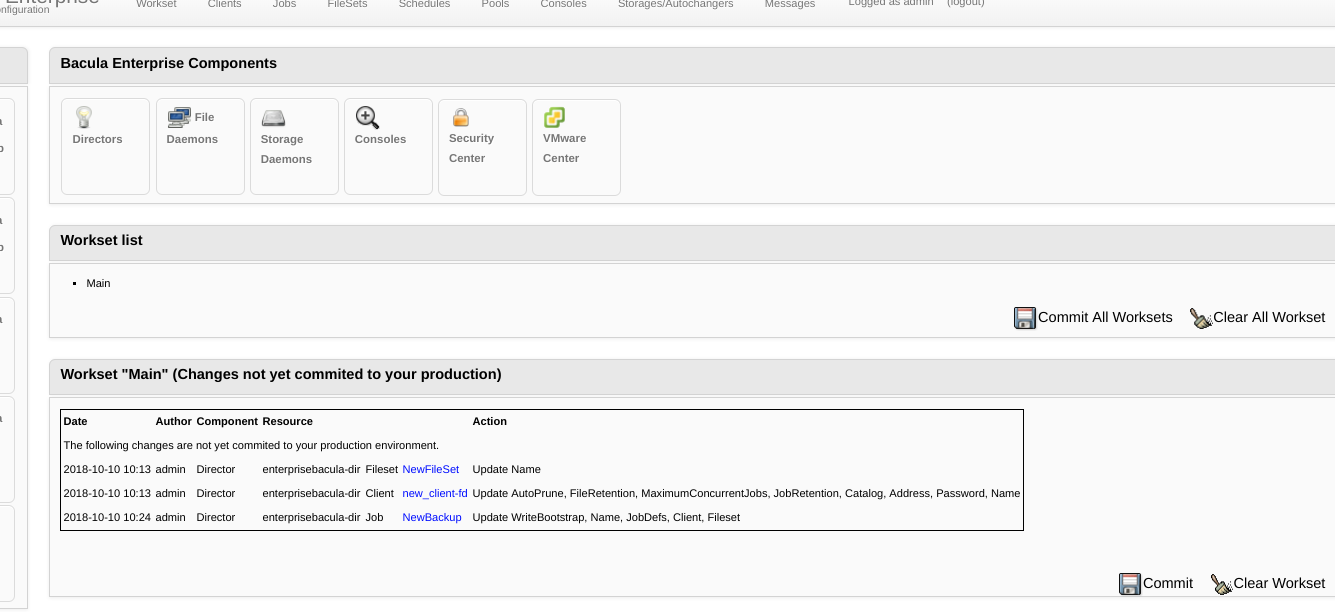
Finally, according to Figure 58, return to the Workset menu of the Configuration Module to Commit (Commit) the changes to the Bacula Director. You will have the option to apply them hot (Reload) or restart the Director (restart). The last one aborts any running Jobs.
Figure 58. Configuration Module, Workset menu, Commit Changes
Finally, it is recommended to run this Backup Job as a test, returning to the Administration Module, Jobs Menu, Defined Jobs.
Adding Devices and New Daemons Storages
New Storage Daemon and/or New Storage Device
In the case of installing a Storage Daemon on a second machine, it must have the same version and be compiled to use the same database as the Bacula Director’s Catalog. In EBacula there is no specific installation package for SD, so you need to install the package that also contains the Director and the File Daemon (eg, bacula-enterprise-postgresql), and disable or ignore the second Director (e.g. systemctl disable bacula-director).
After installing the Storage Daemon on the machine that you want to store backups, you need to tie it to the Director. For that, we must edit the file /opt/bacula/etc/bacula-sd.conf from Storage Linux or C:/Program Files/Bacula/bacula-sd.conf (Windows) so that the name of the Director authorized to access this Client. In the case of Windows, you could have already informed the Director’s name during the installation wizard.
You can obtain the Director’s name in two ways (as seen in the topic of Adding new customers). Whether through the Web CLI (version command, you need to enable it in the Bweb configuration) or by accessing the Configuration Module> Directors button in the center of the screen. In my case the Director’s name is enterprisebacula-dir.
Your Storage configuration file (bacula-sd.conf) should look like this (ignore the other Director -mon resource that has the Monitor=yes directive).
Director {
  Name = "enterprisebacula-dir"
  Password = "30HLZox4K4idLu+j97SHDbXJYgduxUUD+kpVPyEgj1I9"
}
Take advantage of this moment to copy the password value (Password) to a notepad. Also copy the Autochanger Name that you want to use to store the backups and the value of the MediaType directive of your devices to a notepad, as we will need it later to tie it to the Director. Example:
Autochanger {
  Name = "FileChgr1" #### Required for bacula-dir.conf Storage Resource
  ChangerCommand = ""
  ChangerDevice = "/dev/null"
  Device = "FileChgr1-Dev1","FileChgr1-Dev2"
}

Device {
  Name = "FileChgr1-Dev1"
  AlwaysOpen = no
  ArchiveDevice = "/mnt/dedup"
  AutomaticMount = yes
  DeviceType = Dedup
  LabelMedia = yes
  MaximumConcurrentJobs = 5
  MediaType = "Dedup" #### Required for bacula-dir.conf Storage Resource
  RandomAccess = yes
  RemovableMedia = no
}
Note: Autochanger is the name Bacula uses for all devices including backup to disk, partitions, NAS etc., because even for disk several virtual recording heads (Devices) are already configured or can be created by the administrator .
Restart the bacula-sd service to apply the changes.
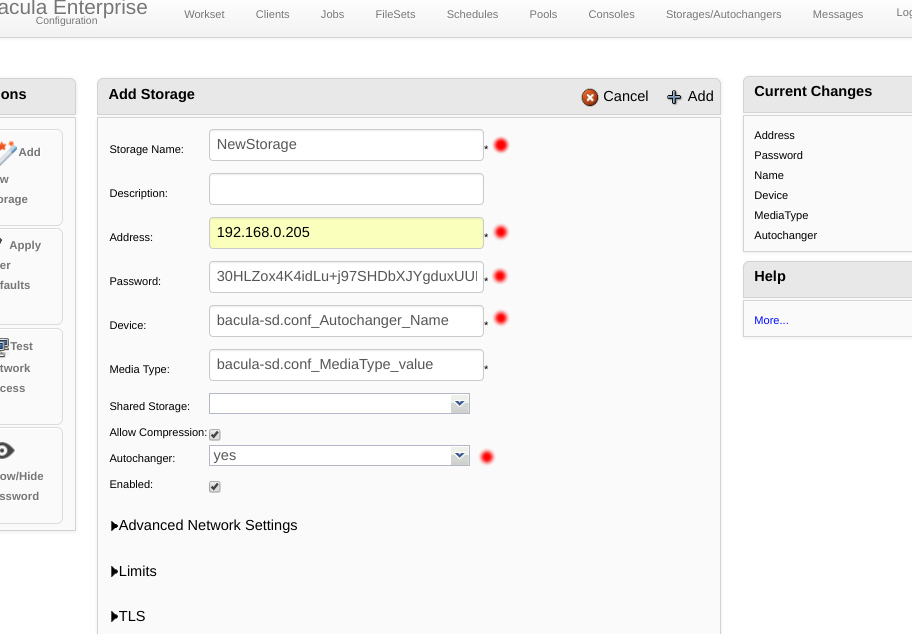
Returning the Bweb, according to Figure 59, go to the Configuration Module, Storages Menu and click on the plus button to fill in the information for the new Storage Device. Use the IP address or qualified name of the Storage machine, the password, the name of the Autochanger (Device) and the MediaType you copied in the previous step. Also modify the Autochanger field so that it refers to the Storage Name you defined, or simply true (yes).
Figure 60. Configuration Module, Storage Menu, New Storage for the Director
At this point you may want to create new Backup Pools that use this new Storage, as it is highly recommended to have separate Pools for different devices. Likewise, you will want to configure a new Schedule (Job), JobDefs and/or Jobs, or modify the existing ones to use this new pair of Pool and Storage.
When finished with the settings, return to the Workset menu of the Configuration Module to Commit (Commit) the changes to the Bacula Director. Run a test Job to test the new Storage Device.
Disponível em:  Português (Portuguese (Brazil))
 English
 Español (Spanish)

